Introduction to MySQL Replication
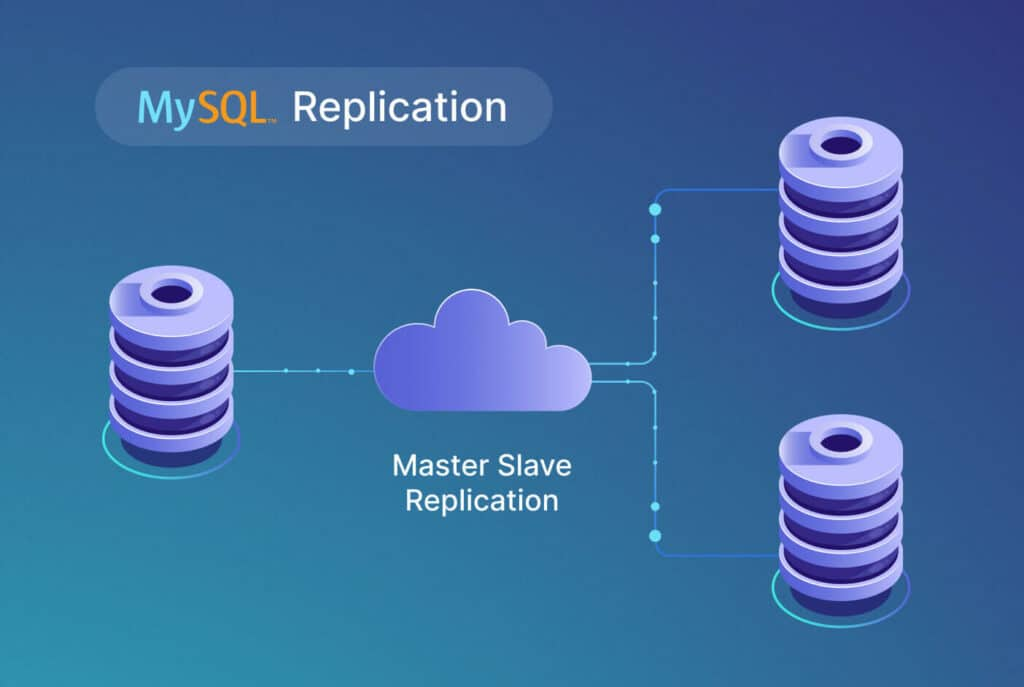
MySQL replication is a process in which data from one MySQL database server, known as the master, is copied to one or more MySQL database servers, known as slaves. This process allows for the duplication of data across multiple servers in real-time or near-real-time, providing several benefits:
– High Availability: Replication improves data availability by maintaining redundant copies on multiple servers. If the master server experiences a failure or downtime, one of the slave servers can be promoted to act as the new master, ensuring continuous access to data
– Load Distribution: By distributing read queries across multiple slave servers, replication helps distribute the read workload, thereby improving the overall performance of the database system. This is particularly useful in scenarios with heavy read traffic.
– Data Backup: Replication serves as a means of data backup by maintaining synchronized copies of data on multiple servers. In case of data loss or corruption on the master server, the data can be recovered from one of the slave servers.
– Scalability: Replication facilitates horizontal scaling by allowing additional slave servers to be added to the replication topology. As the workload increases, new slave servers can be provisioned to handle the additional load, thereby scaling out the database infrastructure.
– Geographic Distribution: Replication enables data to be replicated across geographically dispersed locations, benefiting distributed applications or serving users in different regions. This helps reduce latency and improve the user experience.
Replication types
Let’s explore the different types of MySQL replication and their configurations. MySQL replication is primarily classified into two main types: semi-synchronous and asynchronous. Additionally, the binary log events, which play a crucial role in replication, can be formatted in three ways: statement-based, row-based, and mixed. In this article, we’ll focus on understanding the two primary behaviors of MySQL replication.
Asynchronous Replication
How it works
First, this article introduces the traditional replication method as known as the asynchronous replication. This process includes 4 steps, 2 on the master side and 2 on the slave side.
Whenever modifications are made to the master’s database, they are recorded in a file known as the binary log, or simply binlog. This log is created by the same client thread responsible for executing the query. It essentially acts as a written account of all events that alter the database’s structure (DDL) or content (DML) since the server’s initiation.
The master employs a thread referred to as the dump thread, which consistently reads the master’s binlog and transmits it to the replicas. Dump threads are generated for each replica that is synchronized to these modifications. For instance, if 100 writes are occurring on the master within a second and there are 4 connected replicas, then 400 dump threads will be initiated. Each replica connected to the source requests its copy of the binary log. It’s important to note that replicas retrieve data from the source rather than the source pushing data to the replicas.
On the replica’s end, a thread is known as the IO thread, responsible for receiving binlog changes sent by the master’s dump thread and writing them into a file called the relay log.
Furthermore, the replica operates another thread called the SQL thread, which consistently reads the relay log and implements the changes onto the replica server.
Advantages and Disadvantages
Advantages
– Performance: Asynchronous replication generally offers better performance compared to synchronous replication since it doesn’t wait for confirmation from the slave before proceeding on the master.
– Latency: Asynchronous replication reduces latency as transactions don’t have to wait for acknowledgment from the slave, allowing the master to continue processing transactions without delay.
– Network Tolerance: Asynchronous replication is more tolerant to network latency and interruptions since the master doesn’t wait for confirmation from the slave.
– Scalability: Asynchronous replication allows for scaling out read-heavy workloads by distributing read queries to multiple slaves, thereby improving overall system performance.
– Independence: Slaves can be taken offline for maintenance or upgrades without affecting the master’s operations since the master does not depend on them for confirmation.
– Load Balancing: Asynchronous replication enables load balancing by distributing read queries across multiple slaves, thereby reducing the load on the master.
Disadvantages
– Data Consistency: Asynchronous replication may lead to data inconsistency between the master and slave in case of network failures or if the slave falls behind due to heavy load.
– Risk of Data Loss: There’s a risk of data loss in case of master failure or network interruptions since transactions may not be replicated to the slave before such events occur.
– Potential Lag: Slaves in asynchronous replication setups may lag behind the master, resulting in outdated data being served to clients until replication catches up.
Configuration
Server Configuration and User
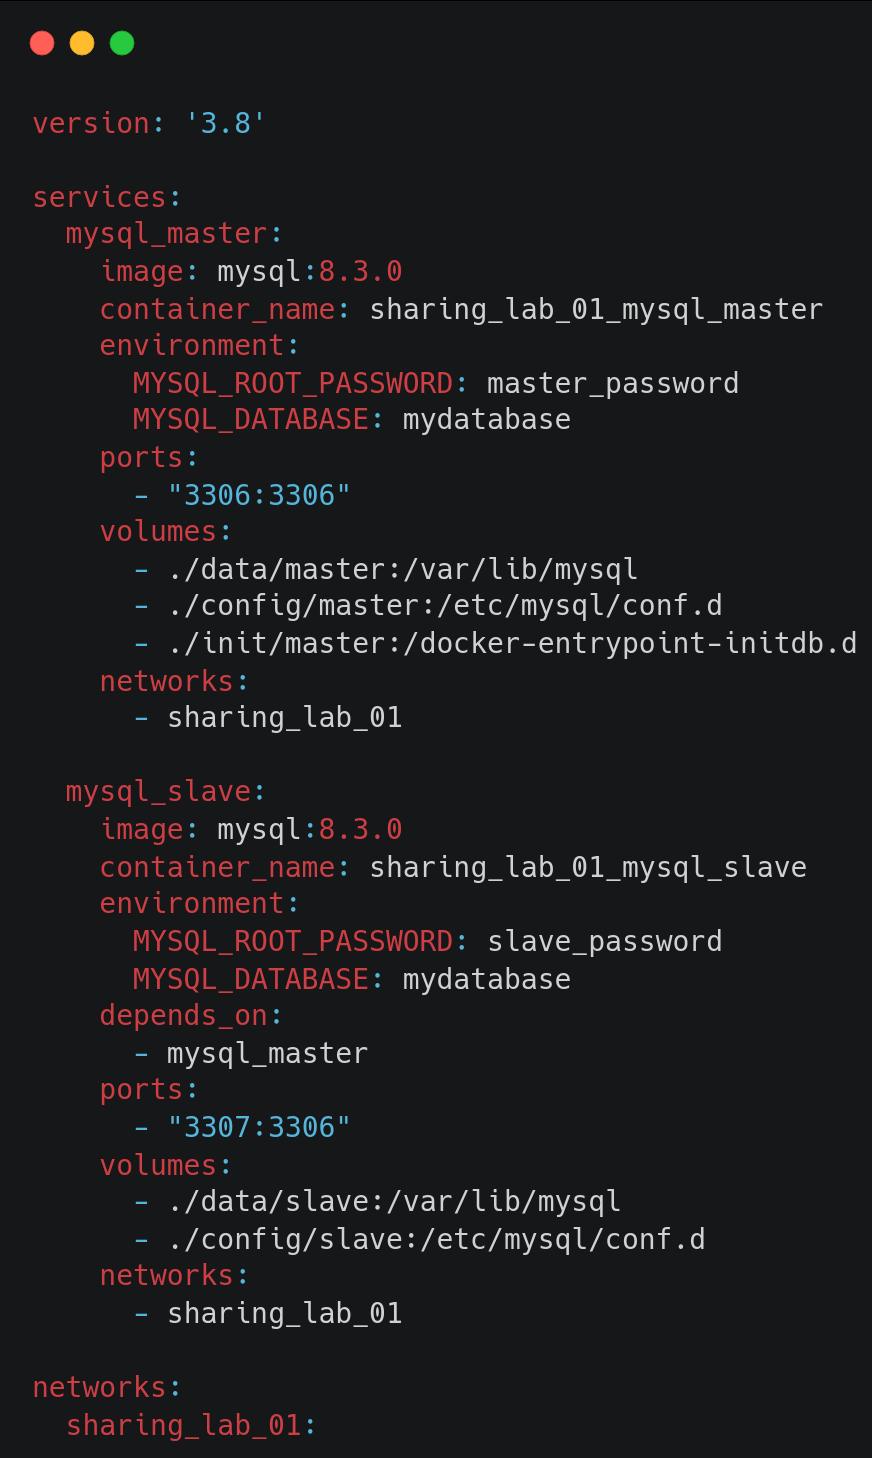
Let’s begin with the traditional method of replication, asynchronous replication. To keep things simple, we will use Docker with Compose to set up two MySQL databases – one master and one slave, using the YAML file below.
Note that we have two folders for storing config: ./config/master and ./config/slave. These folders will be mounted to folder /etc/mysql/conf.d in the containers. In each of these folders, we will create a mysqld.cnf file.
This config file of the master server includes server-id and log-bin. To set up a replication environment in MySQL, it is necessary to define a unique identifier for each server using server-id. MySQL uses this identifier internally to distinguish servers. It is crucial to assign a different server-id value to every server in the replication setup, including the source and its replicas. In addition, to change the name of binary log files, we need to modify the log-bin value.
In the slave, we just need to change the server-id to a value different from the master’s id, e.g. 2.
An SQL script is mounted to the master container. This script is responsible for creating a new user and granting it replication permissions. Each replica connects to the master database using a unique username and password. While replicas can use any profile that has the necessary privileges, it’s best to use a dedicated user for replication purposes. Please note that this user is created with the mysql_native_password plugin, which is deprecated. However, we’re using it in this lab to reduce complexity. In real-world scenarios, it’s recommended to use more secure authentication plugins like caching_sha2_password.
Data preparation
To ensure that no users make any changes to the data while you retrieve the coordinates, which could cause issues, it is necessary to lock the database to prevent any clients from reading or writing data. You will unlock everything shortly, but this procedure will cause some amount of downtime for your database.
First, you will connect to the master database using a database client. I prefer mycli since it works well with the terminal and offers features like auto-completion and syntax highlighting. Then run the lock operation to close all the open tables in every database on your source instance and lock them.
Before moving on to the next step, if the master database already contains data and the slave databases need to have the same data, it is necessary to duplicate the data from the master to the slaves. This can be done using either the native MySQL CLI mysqldump – mysqlrestore or more efficient tools mydumper – myloader to clone the master database.
Retrieve binary log coordinates from the master
To replicate data using MySQL’s binary log file position-based replication, we need to give the replica a set of coordinates that specify the name of the source’s binary log file and a specific position within that file. By using these coordinates, the replica can determine the exact point in the log file from which it needs to start copying database events and keep track of the events it has already processed.
This step will guide you on how to get the current binary log coordinates of the source instance. These coordinates will help you set your replicas to start replicating data from the most recent point in the log file.
Connect to the master database client and enter the above command to obtain the binary log name and current binary log coordinates.
Configure the replication in the slave database
Enter the command above from the database client connected to the slave database to configure replication on the slave. Please ensure that you replace the parameters with the appropriate values based on your setup. Since MySQL databases are in Docker containers, the SOURCE_HOST refers to the name of the master container. Additionally, SOURCE_LOG_FILE and SOURCE_LOG_POS are the values that we obtained in the previous step.
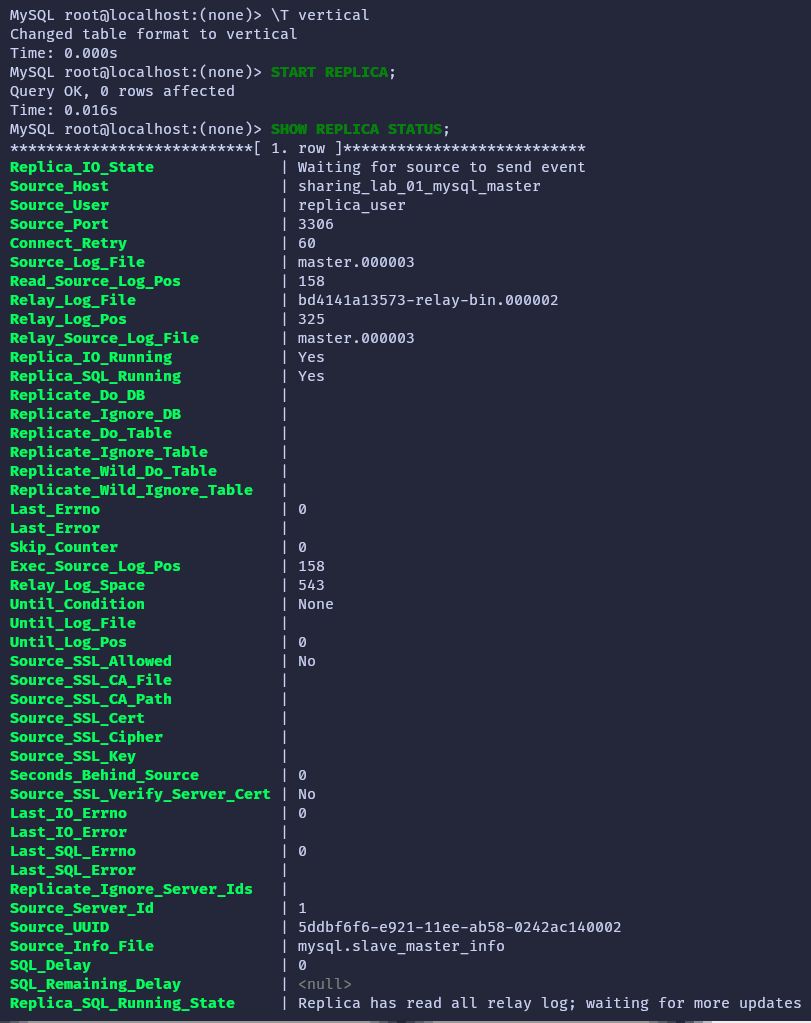
Start and show replication status by running the commands in the image. Change the table output format for a better view.
Check the replication
The replica database is currently in the process of copying data from the source database. It’s important to note that any changes made to the source database will be reflected in the replica MySQL instance. To confirm this, you can create a sample table on your source database and check if it’s successfully replicated. However, don’t forget to unlock tables before creating a new table.
After creating a table and adding some sample data to it, switch to the MySQL shell of your replica server. Then, select the replicated database and execute the SHOW TABLES command (or dt if you are using the CLI). This will display a list of all the tables that exist in the selected database. If the replication is functioning correctly, you should be able to see the table you added to the source listed in the output of this command.
Semi-synchronous Replication
How it works
Semi-synchronous MySQL replication works by the master server waiting for acknowledgment from at least one slave before committing a transaction. Once acknowledgment is received, the master commits the transaction and sends it to other slaves asynchronously. This method ensures that at least one slave has received and confirmed the transaction, enhancing data reliability.
Advantages and Disadvantages
Advantages
– Enhanced Data Reliability: Semi-synchronous replication ensures that at least one slave has received and confirmed the transaction before it is committed on the master, thereby improving data consistency and reliability.
– Reduced Risk of Data Loss: By waiting for acknowledgment from at least one slave before committing a transaction, semi-synchronous replication reduces the risk of data loss compared to asynchronous replication, where data may not be replicated to any slave before a failure occurs.
– Improved Fault Tolerance: Semi-synchronous replication enhances fault tolerance by ensuring that critical transactions are replicated to at least one slave before being committed, reducing the impact of master failures on data integrity.
– Synchronization Assurance: This replication method assures that data is synchronized between the master and at least one slave, making it suitable for applications requiring strict consistency guarantees.
Disadvantages
– Potential Performance Overhead: Semi-synchronous replication may introduce performance overhead on the master server, as it needs to wait for acknowledgment from at least one slave before committing transactions.
– Complexity in Configuration: Configuring and managing semi-synchronous replication setups can be more complex compared to asynchronous replication, requiring careful consideration of network latency and slave health.
– Increased Risk of Delay: If slaves are experiencing network issues or high latency, semi-synchronous replication may cause delays in transaction processing on the master, impacting overall system performance.
– Dependency on Slave Availability: Semi-synchronous replication depends on the availability and responsiveness of at least one slave to confirm transactions, making it vulnerable to issues with slave servers.
Configuration
Prerequisites
To implement semi-synchronous replication, you need to make sure that certain requirements are met:
– The MySQL server must support dynamic loading for plugin installation. You can verify this by ensuring that the have_dynamic_loading system variable is set to YES with the command SELECT @@have_dynamic_loading. Additionally, binary distributions should also support dynamic loading.
– Asynchronous replication should already be operational.
– It is not recommended to configure multiple replication channels with semi-synchronous replication as it only works with the default replication channel. If you have already set up asynchronous replication using the instructions in this article, then this requirement will be met.
Configure the replication
Semi-synchronous replication is a feature that requires plugins to be installed on both the source and replica instances. To enable this feature, you must install different plugins on the source and the replica. For the source, you need to install the plugin rpl_semi_sync_source, and for the replica, you need to install the plugin rpl_semi_sync_replica.
When you install a semi-synchronous replication plugin, it is important to note that the plugin is disabled by default. To enable semi-synchronous replication, you need to ensure that the plugin is enabled on both the source and the replica side. If the plugin is only enabled on one side, then the replication will occur asynchronously.
You also need to start the replication I/O (receiver) thread, stopping it first if it’s already running, to allow the replica to connect to the source and register as a semi-synchronous replica.
Some useful options
The rpl_semi_sync_source_timeout parameter specifies the maximum time, in milliseconds, that the source server will wait for an acknowledgment from a replica before falling back to asynchronous replication. The default value for this parameter is 10000 milliseconds (10 seconds). This timeout ensures that the source server doesn’t wait indefinitely for a response, providing a balance between ensuring data consistency and avoiding excessive delays in transaction processing.
The rpl_semi_sync_source_wait_for_replica_count parameter determines the minimum number of replicas that must acknowledge receipt of a transaction before the source considers the transaction to be committed. The default value is 1, meaning that at least one replica must confirm the transaction. This default setting provides a basic level of fault tolerance while still maintaining relatively low latency in the replication process.
The rpl_semi_sync_source_wait_point parameter defines the point in the transaction process where the source server waits for acknowledgment from a replica. The default value is AFTER_SYNC, meaning the source waits after the transaction is written to the binary log but before it is committed. This default configuration offers a compromise between performance and data durability, ensuring that the transaction is logged before the source server proceeds, without waiting for the full commit.
Check the replication
You can create a table, similar to the one used in the asynchronous replication demo, to verify that replication is functioning correctly. Next, we’ll shut down the replica and insert some data into the table. You’ll notice it takes 10 seconds to insert 2 rows. This delay occurs because the source server attempts to replicate the data to at least one replica (the default behavior of rpl_semi_sync_source_wait_for_replica_count), with a 10-second timeout (rpl_semi_sync_source_timeout).
Conclusion
This article has provided you with useful insights into MySQL replication. You have understood the pros and cons of its two types: Semi-Synchronous and Asynchronous Replication, as well as their configurations.
If you have any questions about MySQL replication, please get in touch with us for a consultation. With experience in hundreds of outsourcing projects, the DevOps engineers at Saigon Technology are ready to help you.
Resources
– Demo source code: GitHub – saigontechnology/mysql-replication
References
– https://www.buildatscale.tech/how-replication-works-in-mysql/
– https://dev.mysql.com/doc/refman/8.0/en/
– https://www.digitalocean.com/community/tutorials/how-to-set-up-replication-in-mysql
– https://serverfault.com/questions/75417/mysql-master-slave-setup-with-synchronous-replication


