1. Why Create English Learning Videos for TikTok Using Remotion?
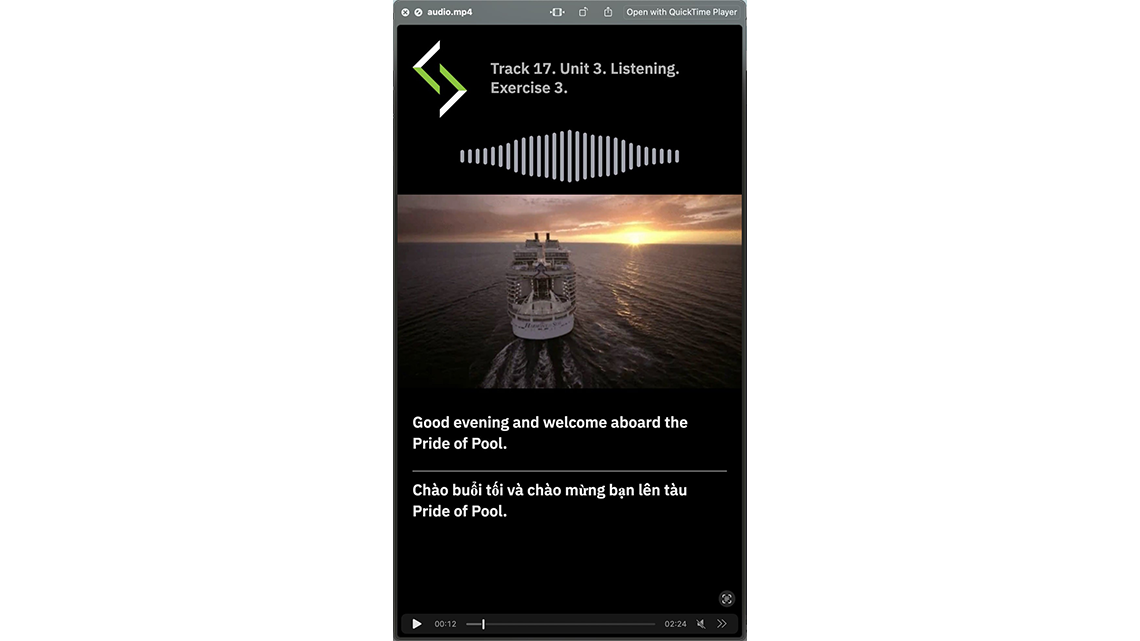
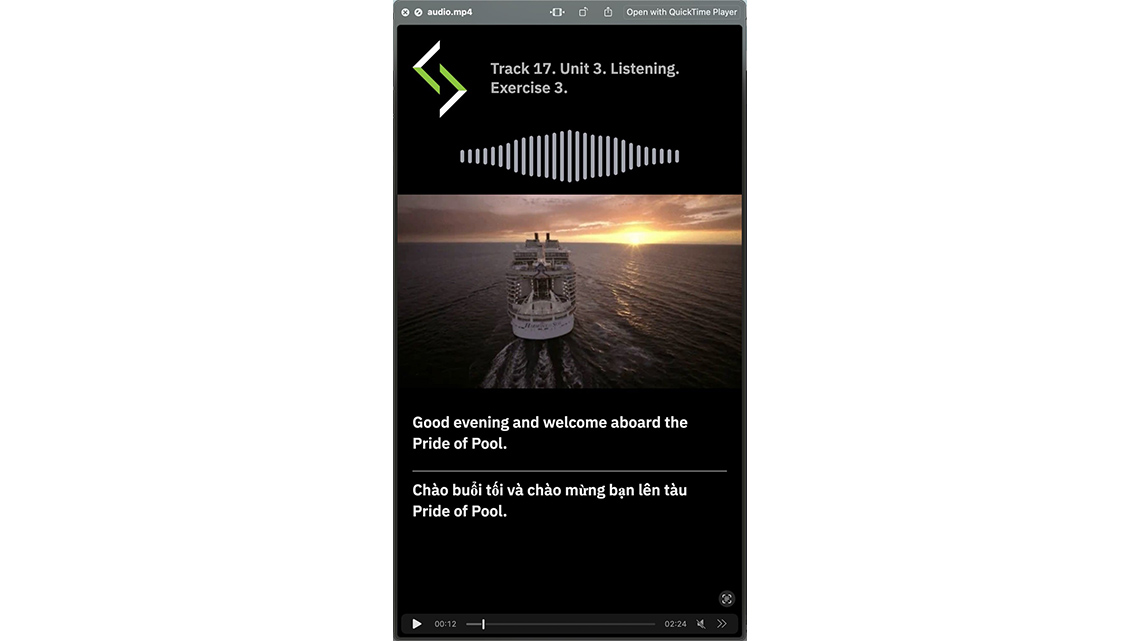
As I work on improving my English skills, I often listen to English audio recordings. Whether I’m jogging, commuting, or simply relaxing, I find it convenient to listen to this audio on my phone. However, there’s a significant drawback: I can’t view subtitles on my phone as I can on my computer.
Recently, I’ve noticed a surge in English learning videos on TikTok. This inspired me to create my own English learning videos, combining audio with both English and Vietnamese subtitles. This not only caters to my learning needs but also allows me to share these resources with others.
However, to create the videos I envisioned, I would need to spend additional time learning audio and video editing software. This would be a time-consuming process, and I might not achieve the desired results. As a programmer, I wondered if there was a library that could help me programmatically create videos. After some research, I discovered Remotion.
2. Introduction to Remotion
2.1. What is Remotion?
Remotion is an innovative library that allows developers to create videos programmatically using React. By leveraging the power of React components, Remotion enables the creation of dynamic, customizable videos with ease. This tool is particularly useful for developers who are already familiar with React, as it allows them to apply their existing knowledge to video creation.
2.2. Why Use Remotion?
There are several compelling reasons to use Remotion for video creation:
– Efficiency: Remotion streamlines the video creation process by allowing developers to write code instead of manually editing videos. This can save a significant amount of time, especially for those who are already proficient in React.
– Customization: With Remotion, you can create highly customized videos tailored to your specific needs. The flexibility of React components means you can easily adjust and update your videos as required.
– Scalability: Remotion is ideal for projects that require the generation of multiple videos with similar structures but different content. By using code, you can automate the creation of these videos, ensuring consistency and saving time.
2.3. When to Use Remotion?
Remotion is particularly useful in the following scenarios:
– Educational Content: Creating educational videos with dynamic content, such as subtitles, animations, and interactive elements.
– Marketing: Generating promotional videos that need to be updated frequently or personalized for different audiences.
– Data Visualization: Producing videos that visualize data in real-time, such as charts, graphs, and other dynamic elements.
– Automated Video Generation: Any situation where you need to create a large number of videos programmatically, such as for social media campaigns or personalized messages.
2.4. Strengths and Weaknesses of Remotion
Strengths:
– Integration with React: Seamlessly integrates with React, making it easy for developers familiar with the framework to get started.
– Flexibility: Highly customizable, allowing for the creation of a wide range of video types.
– Efficiency: Automates the video creation process, saving time and effort.
Weaknesses:
– Learning Curve: Requires knowledge of React, which might be a barrier for those unfamiliar with the framework.
– Performance: Depending on the complexity of the video, rendering times can be significant, especially for high-resolution outputs.
– Dependency on Code: Non-developers might find it challenging to use, as it relies heavily on coding skills.
2.5. Key Features of Remotion
– Component-Based Video Creation: Remotion leverages the power of React components to build videos. This means you can create reusable and modular components for different parts of your video, such as text overlays, animations, and transitions. This component-based approach not only makes your code more organized but also allows for easy updates and maintenance.
– Smooth Animations: One of the standout features of Remotion is its ability to create smooth and dynamic animations. By using React’s state and props, you can control the timing, duration, and easing of animations, making your videos more engaging and visually appealing. Whether it’s a simple fade-in effect or a complex motion graphic, Remotion has you covered.
– Rendering Flexibility: With Remotion, you have the flexibility to render your videos in various formats and resolutions. Whether you need a high-definition video for YouTube or a compressed version for social media, Remotion provides the tools to export your videos in the desired format. This ensures that your content looks great on any platform.
3. Crafting an English Learning Video with Remotion
3.1. Prerequisites
To create a video using Remotion, you need to follow a few prerequisites and setup steps. This section will guide you through the necessary conditions to run Remotion and how to extract subtitles from an MP3 file.
Before you can start creating videos with Remotion, ensure you have the following:
1. Node.js: Remotion requires Node.js version 16 or higher. You can download and install Node.js from the official website.
2. Code Editor: A code editor like Visual Studio Code is recommended for writing and managing your code.
3. Basic Knowledge of React: Since Remotion is built on React, familiarity with React concepts is essential.
Once you have the prerequisites in place, follow these steps to install Remotion:
1. Initialize a New Project: Open your terminal and run the following command to create a new Remotion project:
JavaScript
npx create-video my-remotion-video
This command will scaffold a new project with the necessary files and dependencies.
2. Navigate to the Project Directory:
JavaScript
cd my-remotion-video
3. Start the Remotion Studio
JavaScript
npm start
This will launch the Remotion Studio, where you can preview and edit your video.
To create an English learning video with subtitles, you’ll need to extract subtitles from your MP3 file. Here are a few methods to do this:
1. Using Online Tools: There are several online tools available that can convert audio files to text and generate SRT files. Websites like Happy Scribe and Sonix offer transcription services that can produce SRT files from MP3s.
2. Using Software: You can also use software like Aegisub or Subtitle Edit to manually create subtitles. These tools allow you to listen to the audio and type out the subtitles, which can then be saved as SRT files.
3. Using Speech Recognition APIs: For a more automated approach, you can use speech recognition APIs like Google Cloud Speech-to-Text or IBM Watson. These APIs can transcribe audio files and generate subtitle files programmatically. Here’s a basic example using Google Cloud Speech-to-Text:
JavaScript
const speech = require(‘@google-cloud/speech’);
const fs = require(‘fs’);
const client = new speech.SpeechClient();
async function transcribeAudio() {
const fileName = ‘path/to/your/audio.mp3’;
const audio = {
content: fs.readFileSync(fileName).toString(‘base64’),
};
const request = {
audio: audio,
config: {
encoding: ‘MP3’,
sampleRateHertz: 16000,
languageCode: ‘en-US’,
},
};
const [response] = await client.recognize(request);
const transcription = response.results
.map(result => result.alternatives[0].transcript)
.join(‘n’);
console.log(`Transcription: ${transcription}`);
}
transcribeAudio();
3.2. Project Structure
The public folder is where you’ll store all your static assets, such as audio files and images. These files are essential for your video content and need to be easily accessible during the video creation process.
– Audio Files: Store your MP3 files here. These audio files will be used as the soundtrack for your videos.
-Images: Any images you plan to use in your videos, such as background images or graphics, should be placed in this folder.
Unset
public/
├── audio.mp3
├── cover.png
└── subtitles.srt
The src folder contains the core components and styles for your Remotion project. This is where you’ll write the code that defines the structure and behavior of your video. Here are the key files you’ll find in the src folder:
– Composition.tsx: This file defines the main composition of your video. It specifies the duration, dimensions, and other properties of your video. You’ll also use this file to import and arrange the various components that make up your video.
– Root.tsx: The entry point of your Remotion project. This file sets up the Remotion environment and renders the main composition. It’s essentially the starting point for your video rendering process.
-styles.css: This file contains the CSS styles for your video components. You can define global styles here or import other CSS files as needed. Styling is crucial for making your video visually appealing.
– Subtitles.tsx: A component dedicated to handling subtitles. This file will manage the display and synchronization of subtitles with your audio. It’s essential for adding text overlays that enhance the learning experience.
– Word.tsx: This component is used to highlight individual words or phrases in your subtitles. It allows for dynamic text effects, such as changing colors or adding animations, to emphasize key parts of the audio.
Unset
src/
├── Composition.tsx
├── Root.tsx
├── styles.css
├── Subtitles.tsx
└── Word.tsx
3.3. Creating Transition Effects
Video is structured into three distinct parts:
1. Introduction: This section introduces the video and provides some context about the content.
2. Main Content: The core part of the video where the audio plays along with English and Vietnamese
3. Closing: The final section where we thank the viewers for watching
To enhance the viewing experience, we’ll use two types of transition effects:
– Wipe Effect: This effect will transition from the introduction to the main content.
-ClockWipe Effect: This effect will transition from the main content to the closing section.
Let’s look at the code in Composition.tsx that implements these transitions.
JavaScript
export const AudiogramComposition: React.FC<AudiogramCompositionSchemaType> = (props) => {
const { durationInFrames, width, height } = useVideoConfig();
const ref = useRef<HTMLDivElement>(null);
return (
<div ref={ref}>
<AbsoluteFill>
<TransitionSeries>
<TransitionSeries.Sequence durationInFrames={120}>
<div className=”container center”>
{/* Code UI for introduction */}
</div>
</TransitionSeries.Sequence>
<TransitionSeries.Transition
presentation={wipe()}
timing={linearTiming({ durationInFrames: 30 })}
/>
<TransitionSeries.Sequence durationInFrames={durationInFrames – 120}>
<div className=”container”>
{/* Code UI for main video */}
</div>
</TransitionSeries.Sequence>
<TransitionSeries.Transition
presentation={clockWipe({ width, height })}
timing={linearTiming({ durationInFrames: 30 })}
/>
<TransitionSeries.Sequence durationInFrames={durationInFrames}>
<div className=”container center”>
{/* Code UI for closing */}
</div>
</TransitionSeries.Sequence>
</TransitionSeries>
</AbsoluteFill>
</div>
);
};
We use TransitionSeries to manage the sequences and transitions between different parts of the video. The first TransitionSeries. The sequence runs for 120 frames and contains the UI for the opening scene.
We use TransitionSeries.Transition with the wipe() effect and a linear timing of 30 frames to transition from the introduction to the main content.
The second TransitionSeries.The sequence runs for the remaining duration of the video minus the introduction frames and contains the UI for the main video.
We use another TransitionSeries.Transition with the clockWipe() effect and a linear timing of 30 frames to transition from the main content to the closing section.
The final TransitionSeries. The sequence runs for the remaining frames and contains the UI for the ending scene.
3.4. Playing Audio and Creating an Audio Wave Visualization
We’ll explore how to play audio and create an audio wave visualization for video. We’ll break down the code used in the second TransitionSeries.Sequence to understand how it works.
Here’s the code snippet we’ll be discussing:
JavaScript
import { useAudioData, visualizeAudio } from ‘@remotion/media-utils’;
import React from ‘react’;
import { AbsoluteFill, Audio, useCurrentFrame, useVideoConfig, staticFile } from ‘remotion’;
import { TransitionSeries } from ‘@remotion/transitions’;
const AudioViz: React.FC<{
waveColor: string;
numberOfSamples: number;
freqRangeStartIndex: number;
waveLinesToDisplay: number;
mirrorWave: boolean;
audioSrc: string;
}> = ({
waveColor,
numberOfSamples,
freqRangeStartIndex,
waveLinesToDisplay,
mirrorWave,
audioSrc,
}) => {
const frame = useCurrentFrame();
const { fps } = useVideoConfig();
const audioData = useAudioData(audioSrc);
if (!audioData) {
return null;
}
const frequencyData = visualizeAudio({
fps,
frame,
audioData,
numberOfSamples, // Use more samples to get a nicer visualisation
});
// Pick the low values because they look nicer than high values
// feel free to play around 🙂
const frequencyDataSubset = frequencyData.slice(
freqRangeStartIndex,
freqRangeStartIndex +
(mirrorWave ? Math.round(waveLinesToDisplay / 2) : waveLinesToDisplay),
);
const frequenciesToDisplay = mirrorWave
? […frequencyDataSubset.slice(1).reverse(), …frequencyDataSubset]
: frequencyDataSubset;
return (
<div className=”audio-viz”>
{frequenciesToDisplay.map((v, i) => {
return (
<div
key={i}
className=”bar”
style={{
minWidth: ‘1px’,
backgroundColor: waveColor,
height: `${500 * Math.sqrt(v)}%`,
}}
/>
);
})}
</div>
);
};
export const AudiogramComposition: React.FC<AudiogramCompositionSchemaType> = (
props,
) => {
// …
return (
<div ref={ref}>
<AbsoluteFill>
<TransitionSeries>
{/* … */}
<TransitionSeries.Sequence durationInFrames={durationInFrames – 120}>
<div className=”container”>
<Audio pauseWhenBuffering src={staticFile(‘audio.mp3’)} />
<AudioViz
audioSrc={staticFile(‘audio.mp3’)}
mirrorWave={true}
waveColor={‘#a3a5ae’}
numberOfSamples={Number(‘256’)}
freqRangeStartIndex={7}
waveLinesToDisplay={29}
/>
</div>
</TransitionSeries.Sequence>
{/* … */}
</TransitionSeries>
</AbsoluteFill>
</div>
);
};
Playing Audio: The Audio component from Remotion plays the audio file. The pauseWhenBuffering prop ensures smooth playback by pausing if the audio is buffering.
Visualizing the Audio Wave: The AudioViz component creates a visual representation of the audio frequencies. The bars’ heights are determined by the frequency data, creating a dynamic wave effect that syncs with the audio.
– useAudioData loads the audio data from the provided audioSrc.
– visualizeAudio processes the audio data to generate frequency data for visualization.
– The frequency data is sliced and optionally mirrored to create a symmetrical wave effect.
3.5. Adding Subtitles
Here’s the code snippet we’ll be discussing:
JavaScript
import { AbsoluteFill, continueRender, delayRender } from ‘remotion’;
export const AudiogramComposition: React.FC<AudiogramCompositionSchemaType> = (
props,
) => {
// …
const [handle] = useState(() => delayRender());
const [subtitles, setSubtitles] = useState<string | null>(null);
useEffect(() => {
fetch(subtitlesFileName)
.then((res) => res.text())
.then((text) => {
setSubtitles(text);
continueRender(handle);
})
.catch((err) => {
console.log(‘Error fetching subtitles’, err);
});
}, [handle, subtitlesFileName]);
if (!subtitles) {
return null;
}
// …
return (
<div ref={ref}>
<AbsoluteFill>
<TransitionSeries>
{/* … */}
<TransitionSeries.Sequence durationInFrames={durationInFrames – 120}>
<div className=”container”>
<PaginatedSubtitles
subtitles={subtitles}
startFrame={audioOffsetInFrames}
endFrame={audioOffsetInFrames + durationInFrames}
linesPerPage={8}
subtitlesTextColor={‘rgba(255, 255, 255, 0.93)’}
subtitlesZoomMeasurerSize={10}
subtitlesLineHeight={66}
onlyDisplayCurrentSentence={true}
/>
</div>
</TransitionSeries.Sequence>
{/* … */}
</TransitionSeries>
</AbsoluteFill>
</div>
);
};
– We use useState to create a state variable handle that delays the rendering process. This ensures that the video doesn’t start until the subtitles are fully loaded.
– Another state variable subtitles is created to store the fetched subtitle text.
– The useEffect hook is used to fetch the subtitles from a file. The fetch function retrieves the subtitle file and converts the response to text.
– Once the subtitles are fetched, they are stored in the subtitles state variable, and continueRender(handle) is called to resume the rendering process.
– If there’s an error during fetching, it is logged to the console.
– If the subtitles are not yet loaded (!subtitles), the component returns null, preventing the video from rendering until the subtitles are ready.
3.6. Rendering the Video
In this section, we’ll cover how to render video using Remotion and explain the code in Root.tsx
Here’s the code snippet from Root.tsx:
JavaScript
import { Composition, staticFile } from ‘remotion’;
import { AudioGramSchema, AudiogramComposition, fps } from ‘./Composition’;
import ‘./style.css’;
export const RemotionRoot: React.FC = () => {
return (
<>
<Composition
id=”TTEVideo”
component={AudiogramComposition}
fps={fps}
width={1080}
height={1920}
schema={AudioGramSchema}
defaultProps={{
// Define the props that will need to be passed to the AudiogramComposition component
}}
// Determine the length of the video based on the duration of the audio file
calculateMetadata={({ props }) => {
return {
durationInFrames: props.durationInSeconds * fps,
props,
};
}}
/>
</>
);
};
– id=”TTEVideo”: This is the unique identifier for the composition.
– component={AudiogramComposition}: Specifies the component that defines the video content.
– width={1080} and height={1920}: Define the TikTok video dimensions.
– defaultProps={{}}: Placeholder for default props that will be passed to the AudiogramComposition component.
To render the video, you can use one of the following commands:
1. Using npm:
Unset
npm run build
This command will build the project and render the video based on the configuration defined in Root.tsx.
2. Using Remotion CLI
Unset
remotion render TTEVideo out/audio.mp4
– TTEVideo: This is the id of the composition you want to render.
– out/audio.mp4: This specifies the output file path and name. The rendered video will be saved as audio.mp4 in the out directory.
These commands will generate the final video file, which you can then upload to TikTok or any other platform. Here is the result.
– Insert video: https://drive.google.com/file/d/1EHbf9MsSEMESXPAqPbRrIhUdYrCkofAP/view?usp=drive_link
4. Conclusions
Creating educational content for TikTok using Remotion is a powerful way to leverage your programming skills and make learning more accessible and engaging. By following the steps outlined in this blog, you can produce high-quality videos that cater to both your personal learning needs and those of a wider audience.
Thank you for following along with this guide. I hope it has been helpful and inspiring. Happy video-making!
Resources
– Demo source code: Repos’s link
– Video: link
References
– Remotion Docs


.webp)
