Introduction
Regardless of the platform, developers of enterprise apps encounter several challenges:
– Evolving app requirements over time.
– Emerging business opportunities and challenges.
– Continuous feedback during development that can significantly impact the app’s scope and requirements.
Building adaptable apps requires an architecture that allows for easy modification or extension over time. This involves designing the app so that individual parts can be developed and tested independently without affecting the rest of the app.
Many enterprise apps are complex and require multiple developers, making it challenging to design the app in a way that allows for independent development while ensuring seamless integration.
The traditional monolithic approach, where components are tightly coupled, often results in apps that are hard to maintain. Bugs are difficult to fix without impacting other components, and adding or replacing features is inefficient.
This article will help you understand and focus on the core patterns and architecture for building a cross-platform enterprise app using .NET MAUI. My article is designed to help you produce adaptable, maintainable, and testable code by addressing common .NET MAUI enterprise app development scenarios.
Model-View-ViewModel pattern (MVVM)
The MVVM (Model-View-ViewModel) pattern consists of three essential components: the model, the view, and the view model. Each element plays a distinct role in the architecture. The accompanying diagram visually depicts the intricate connections between these components.
The view defines the structural layout and visual presentation that users see on the screen. It’s recommended that each view be outlined in XAML, keeping the code minimal and free from business logic.
The view model defines properties and commands for data binding with the view. It notifies the view of any state changes through change notification events. These properties and commands outline the UI’s functionalities, while the view determines how they are displayed.
Model classes act as non-visual entities that encapsulate an application’s data. Essentially, the model represents the domain model of the application, often incorporating a data model alongside business and validation logic.
How to connect view models to views:
Create a view model declaratively:
– The simplest approach is for the view to declaratively create its associated view model in XAML. When the view is instantiated, so is the corresponding view model object. This method is demonstrated in the following code snippet.
Unset
<ContentPage xmlns:local=”clr-namespace:example”>
<ContentPage.BindingContext>
<local:LoginViewModel />
</ContentPage.BindingContext>
<!– Omitted for brevity… –>
</ContentPage>
Creating a view model programmatically
– In the code-behind file of a view, you can assign the view model to its BindingContext property. Typically, this assignment takes place in the view’s constructor, as shown in the following code example.
Unset
public LoginView()
{
InitializeComponent();
BindingContext = new LoginViewModel(navigationService);
}
Updating views in response to changes in the associated view model or model.
– Every view model and model class accessible to a view should implement the INotifyPropertyChanged interface. This interface allows the class to inform data-bound controls given any changes in the underlying property values.
– For example, the following code shows a simple ViewModel with properties that raise changes.
Unset
public class LoginViewModel : INotifyPropertyChanged
{
private string _email;
private string _password;
public event PropertyChangedEventHandler PropertyChanged;
public string Email
{
get => _email;
set => SetPropertyValue(ref _email, value);
}
public string Password
{
get => _password;
set => SetPropertyValue(ref _password, value);
}
protected void SetPropertyValue(ref T storageField, T newValue, [CallerMemberName] string propertyName = “”)
{
if (Equals(storageField, newValue))
return;
storageField = newValue;
RaisePropertyChanged(propertyName);
}
protected virtual void RaisePropertyChanged([CallerMemberName] string propertyName = “”)
{
PropertyChanged?.Invoke(this, new PropertyChangedEventArgs(propertyName));
}
}
Using the MVVM toolkit in modular mobile applications enhances the architecture, making the app more maintainable, testable, and scalable.
– The MVVM pattern is well-established in .NET, supported by a variety of frameworks developed by the community to simplify its implementation. Each framework offers a unique set of features, but they generally include a standard view model with an implementation of the INotifyPropertyChanged interface. Additional functionalities often provided by MVVM frameworks include custom commands, navigation aids, dependency injection/service location modules, and seamless integration with UI platforms.
– The example below shows the same ViewModel using components that come with the MVVM Toolkit:
Unset
public partial class LoginViewModel : ObservableObject
{
[ObservableProperty]
private string _name;
[ObservableProperty]
private string _value;
}
ObservableObject manages all the logic required for raising change notifications by utilizing the SetProperty method within your property setter.
UI interaction through commands:
– In multi-platform applications, user interactions such as button clicks typically trigger actions, often implemented through event handlers in the code-behind file. However, within the MVVM pattern, executing these actions is the responsibility of the view model, and it is recommended to avoid placing code directly in the code behind.
– View models typically expose public properties that implement the ICommand interface for binding from the view.
– The Command or Command constructor requires an Action callback, which is called when the ICommand.Execute method is invoked. An optional constructor parameter, CanExecute, is a Func that returns a bool.
Unset
public class LoginViewModel : INotifyPropertyChanged
{
···
public ICommand LoginCommand;
public LoginViewModel()
{
LoginCommand = new Command(
execute: () =>
{
// verify user’s credential
isProcessing = true
RefreshCanExecutes();
},
canExecute: () =>
{
return !isProcessing;
});
···
}
void RefreshCanExecutes()
{
(LoginCommand as Command).ChangeCanExecute();
}
···
}
The MVVM Toolkit includes two commands: RelayCommand and AsyncRelayCommand. RelayCommand is suitable for executing synchronous code and shares a similar implementation with the .NET MAUI Command object.
AsyncRelayCommand offers numerous additional capabilities for handling asynchronous workflows. This is frequently encountered in our ViewModel, as it often involves communication with repositories, APIs, databases, and other systems that rely on async/await operations.
Unset
public ICommand SignInCommand { get; }
…
SignInCommand = new AsyncRelayCommand(async () => await SignInAsync());
or
SignInCommand = new AsyncRelayCommand(SignInAsync);
Dependency injection
Dependency injection, a specialized form of the Inversion of Control (IoC) pattern, focuses on acquiring necessary dependencies by delegating the responsibility of injecting these dependencies into an object at runtime to another class.
The code example below demonstrates the structure of the ProfileViewModel class when utilizing dependency injection:
Unset
public partial class LoginViewModel : BaseViewModel
{
private readonly IRestApiService _restApiService;
private readonly INavigationService _navigationService;
private readonly IFingerprint _fingerPrintService;
private readonly IPopupNavigation _popupService;
private readonly IAlertService _alertService;
public LoginViewModel(IRestApiService restApiService,
INavigationService navigationService,
IFingerprint fingerPrintService,
IPopupNavigation popupService,
IAlertService alertService)
{
_restApiService = restApiService;
_navigationService = navigationService;
_fingerPrintService = fingerPrintService;
_popupService = popupService;
_alertService = alertService;
}
…..
}
Using a dependency injection container offers several advantages:
– It eliminates the need for a class to locate its dependencies and manage its lifetimes.
– It allows dependencies to be mapped without affecting the class.
– It facilitates testability by enabling the mocking of dependencies.
– It enhances maintainability by making it easy to add new classes to the application.
In a .NET MAUI app utilizing MVVM, a dependency injection container is generally employed to register and resolve views and view models, as well as to register services and inject them into view models.
The following code example demonstrates how the MAUI app declares the CreateMauiApp method in the MauiProgram class:
Unset
public static class MauiProgram
{
public static MauiApp CreateMauiApp()
=> MauiApp.CreateBuilder()
.UseMauiApp()
// Omitted for brevity
.RegisterAppServices()
.RegisterViewModels()
.RegisterViews()
.Build();
}
RegisterViewModels, and RegisterViews were created to help provide an organized and maintainable registration workflow. The following code shows the RegisterViewModels method:
Unset
public static MauiAppBuilder RegisterViewModels(this MauiAppBuilder mauiAppBuilder)
{
mauiAppBuilder.Services.AddSingleton();
mauiAppBuilder.Services.AddSingleton();
mauiAppBuilder.Services.AddSingleton();
mauiAppBuilder.Services.AddSingleton();
mauiAppBuilder.Services.AddSingleton();
mauiAppBuilder.Services.AddTransient();
mauiAppBuilder.Services.AddTransient();
return mauiAppBuilder;
}
Unset
public static MauiAppBuilder RegisterViews(this MauiAppBuilder mauiAppBuilder)
{
mauiAppBuilder.Services.AddSingleton();
mauiAppBuilder.Services.AddSingleton();
mauiAppBuilder.Services.AddSingleton();
mauiAppBuilder.Services.AddSingleton();
mauiAppBuilder.Services.AddSingleton();
mauiAppBuilder.Services.AddTransient();
mauiAppBuilder.Services.AddTransient();
return mauiAppBuilder;
}
The following table guides when to choose different registration lifetimes.
| Method | Description |
| AddSingleton | It will instantiate the object once, ensuring its presence throughout the application’s lifespan. |
| AddTransient | Each time the object is requested during resolution, a fresh instance is generated. Transient objects lack a predetermined lifespan but usually align with their host’s duration. |
– .NET MAUI supports both automatic and explicit dependency resolution. Automatic dependency resolution uses constructor injection without explicitly requesting dependencies from the container. Explicit dependency resolution happens on demand by directly requesting a dependency from the container.
– In this example, the MainPage constructor receives an injected MainPageViewModel instance. The MainPageViewModel instance, in turn, has ILoggingService and ISettingsService instances injected.
Unset
public class MainPageViewModel
{
readonly ILoggingService _loggingService;
readonly ISettingsService _settingsService;
public MainPageViewModel(ILoggingService loggingService, ISettingsService settingsService)
{
_loggingService = loggingService;
_settingsService = settingsService;
}
}
The dependency injection container can be explicitly accessed from an Element through its Handler.MauiContext.Service property, which is of type IServiceProvider:
Unset
public class MainPageViewModel
{
readonly ILoggingService _loggingService;
readonly ISettingsService _settingsService;
public MainPageViewModel()
{
_loggingService = Application.Current.MainPage.Handler.MauiContext.Services.GetService();
_settingsService = Application.Current.MainPage.Handler.MauiContext.Services.GetService();
}
}
In summary, dependency injection decouples concrete types from the code that depends on them. It typically involves a container that maintains a list of registrations and mappings between interfaces or abstract types and the concrete types that implement or extend them.
Messenger between components
The publish-subscribe pattern is a messaging model where publishers send messages without being aware of the receivers, known as subscribers. Likewise, subscribers listen for specific messages without knowing the publishers.
In .NET, events embody the publish-subscribe pattern and serve as the straightforward method for inter-component communication when loose coupling isn’t necessary, like between a control and its containing page. Nonetheless, memory management issues may arise from the lifetimes of publishers and subscribers, particularly when short-lived objects subscribe to events of static or long-lived objects.
Prior to .NET 7, we used the Messaging Center publish-subscribe pattern. With the release of .NET 7, Messaging Center has been deprecated and replaced by IMessenger in the CommunityToolkit.Mvvm.
The IMessenger interface outlines the publish-subscribe pattern, facilitating message-driven communication between components that are challenging to connect through object and type references.
The IMessenger interface enables multicast functionality for publish-subscribe operations. This implies that multiple publishers can send a single message, while multiple subscribers can listen to that same message.
There are two implementations of the IMessenger interface that come with the CommunityToolkit.Mvvm package.
– The WeakReferenceMessenger employs weak references, making it easier to clean up message subscribers. This is an ideal choice if your subscribers lack a clearly defined lifecycle.
– The StrongReferenceMessenger utilizes strong references, leading to improved performance and a more precisely managed subscription lifetime.
Define Message:
– IMessenger messages consist of custom objects carrying personalized payloads.
Unset
public class AddPodcastMessage : ValueChangedMessage
{
public AddPodcastMessage(int count) : base(count)
{
}
}
Publishing a message
– To broadcast a message, we utilize the IMessenger.Send method, typically accessible via WeakReferenceMessenger.Default.Send or StrongReferenceMessenger.Default.Send. Messages can encompass any object type.
Unset
WeakReferenceMessenger.Default.Send(new Messages.AddPodcastMessage(PopcastCount));
– The Send method publishes the message and its payload using a fire-and-forget approach. As a result, the message is sent even if no subscribers are registered to receive it, and in such cases, the message is simply ignored.
Subscribing to a message
– Subscribers can register to receive messages by using one of the IMessenger.Register overloads.
Unset
WeakReferenceMessenger.Default
.Register(
this,
(recipient, message) =>
{
……
});
– If payload data is provided, avoid modifying it within a callback delegate since multiple threads may simultaneously access the data. To prevent concurrency errors, the payload data should be immutable.
Unsubscribing from a message payload:
– Subscribers can opt out of receiving messages they no longer wish to receive using one of the IMessenger.Unregister overloads, as shown in the following code example:
Unset
// Unregisters the recipient from a message type
WeakReferenceMessenger.Default.Unregister(this);
// Unregisters the recipient from a message type in a specified channel
WeakReferenceMessenger.Default.Unregister(this, 42);
// Unregister the recipient from all messages, across all channels
WeakReferenceMessenger.Default.UnregisterAll(this);
Summary: Messenger facilitates message-based communication between components that are difficult to connect through object and type references. This mechanism enables publishers and subscribers to interact without direct references to each other, reducing dependencies between components and allowing for independent development and testing.
Assessing remote data
Many modern web-based solutions utilize web development services hosted on web servers to deliver functionality to remote client applications. The operations are exposed by a web service from a web API.
Client apps should be able to use the web API without needing to understand the implementation details of the data or operations it exposes.
Making the HTTP Requests:
– The MAUI application employs the HttpClient class to send HTTP requests, utilizing JSON as the media type.
– This class enables asynchronous sending of HTTP requests and receiving of HTTP responses from a resource identified by a URI.
Unset
private readonly Lazy _httpClient =
new Lazy(
() =>
{
var httpClient = new HttpClient();
httpClient.DefaultRequestHeaders.Accept.Add(new MediaTypeWithQualityHeaderValue(“application/json”));
return httpClient;
},
LazyThreadSafetyMode.ExecutionAndPublication);
private HttpClient PrepareRestRequest(AuthenticateModel auth)
{
var httpClient = _httpClient.Value;
if (auth != null)
{
var authenticationString = $”{auth.Email}:{auth.Password}”;
var base64String = Convert.ToBase64String(
Encoding.ASCII.GetBytes(authenticationString));
httpClient.DefaultRequestHeaders.Authorization = new AuthenticationHeaderValue(“Basic”, base64String);
}
else
{
httpClient.DefaultRequestHeaders.Authorization = null;
}
return httpClient;
}
To improve application performance, it is crucial to cache and reuse instances of HttpClient. Creating a new HttpClient for each operation can cause socket exhaustion issues.
Making a GET request:
Unset
public async Task> GetAsync(AuthenticateModel auth, Uri uri)
{
var client = PrepareRestRequest(auth);
var result = new ResponseModel
{
Data = default,
IsSucceed = false,
};
try
{
HttpResponseMessage response = await client.GetAsync(uri);
result.IsSucceed = response.IsSuccessStatusCode;
result.StatusCode = (int)response.StatusCode;
string content = await response.Content.ReadAsStringAsync();
result.Data = JsonSerializer.Deserialize(content, _deSerializerOptions);
}
catch (Exception ex)
{
result.ErrorMessage = ex.Message;
result.StatusCode = 500;
}
return result;
}
– Making a POST request:
Unset
public async Task> PostAsync(AuthenticateModel? auth, Uri uri)
{
var client = PrepareRestRequest(auth);
var result = new ResponseModel
{
Data = default,
IsSucceed = false,
};
try
{
string json = JsonSerializer.Serialize(item, _serializerOptions);
var content = new StringContent(json, Encoding.UTF8, “application/json”);
HttpResponseMessage response = await client.PostAsync(uri, content);
result.IsSucceed = response.IsSuccessStatusCode;
result.StatusCode = (int)response.StatusCode;
string message = await response.Content.ReadAsStringAsync();
}
catch (Exception ex)
{
result.ErrorMessage = ex.Message;
result.StatusCode = 500;
}
return result;
}
Making a DELETE Request
Unset
public async Task> DeleteAsync(AuthenticateModel? auth, Uri uri)
{
var client = PrepareRestRequest(auth);
var result = new ResponseModel
{
Data = default,
IsSucceed = false,
};
try
{
string json = JsonSerializer.Serialize(item, _serializerOptions);
var content = new StringContent(json, Encoding.UTF8, “application/json”);
HttpResponseMessage response = await client.DeleteAsync(uri, content);
result.IsSucceed = response.IsSuccessStatusCode;
result.StatusCode = (int)response.StatusCode;
}
catch (Exception ex)
{
result.ErrorMessage = ex.Message;
result.StatusCode = 500;
}
return result;
}
If an app detects a failure when attempting to send a request to a remote service, it can handle the failure in any of the following ways:
– Retrying the operation: The app can immediately retry the failed request.
– Retrying the operation after a delay: The app should wait for an appropriate amount of time before attempting the request again.
– Cancelling the operation: The application should cancel the request and report an exception.
The retry pattern should be tailored to the app’s business requirements. For instance, it’s crucial to fine-tune the retry count and interval for the specific operation being performed.
Implementing the Retry pattern using Polly in a .NET Core Web application enhances the application’s resilience by handling transient faults gracefully.
Unset
var retryPolicy = Policy
.Handle()
.WaitAndRetryAsync(
retryCount: 3,
sleepDurationProvider: retryAttempt => TimeSpan.FromSeconds(15);
var result = await retryPolicy.ExecuteAsync(async () =>
{
var response = await httpClient.GetAsync(“https://example.api.com/example-data”);
// Check if the request was successful
response.EnsureSuccessStatusCode();
// Process the response if successful
var content = await response.Content.ReadAsStringAsync();
return content;
});
Validation
Any app that accepts user input must ensure its validity. For example, the app could verify that the input contains only characters within a specific range, meets a certain length or adheres to a particular format.
Lack of validation opens the door for users to input data that can lead to app failures. Effective validation enforces business rules and serves as a defense against potential injection of malicious data by attackers.
In the Model-View-ViewModel (MVVM) pattern, it’s common for a view model or model to handle data validation and communicate any validation errors to the view, enabling users to rectify them.
First Approach: Using Observable Validator in MVVM toolkit.
– The ObservableValidator is a base class implementing the INotifyDataErrorInfo interface, providing support for validating properties exposed to other application modules.
– It also inherits from ObservableObject, so it implements INotifyPropertyChanged and INotifyPropertyChanging as well.
Unset
public class RegistrationForm : ObservableValidator
{
private string name;
[Required]
[MinLength(2)]
[MaxLength(100)]
public string Name
{
get => name;
set => SetProperty(ref name, value, true);
}
}
ObservableValidator showcases the following primary functionalities:
– It furnishes a foundational implementation for INotifyDataErrorInfo, offering access to the ErrorsChanged event and other essential APIs.
– It offers the ValidateProperty method, allowing for manual triggering of property validation. This is particularly handy when a property’s validation relies on another property’s value, which may have been updated while the former remains unchanged.
– It provides the ValidateAllProperties method, which automatically validates all public instance properties within the current instance. This occurs only if they are adorned with at least one [ValidationAttribute].
– It features a ClearAllErrors method, handy for resetting a model linked to a form that users may need to refill.
Customizing Validation Techniques.
– An alternative approach to custom validation involves crafting a custom [ValidationAttribute] and embedding the validation logic within the overridden IsValid method.
Unset
public sealed class GreaterThanAttribute : ValidationAttribute
{
public GreaterThanAttribute(string propertyName)
{
PropertyName = propertyName;
}
public string PropertyName { get; }
protected override ValidationResult IsValid(object value, ValidationContext validationContext)
{
object
instance = validationContext.ObjectInstance,
otherValue = instance.GetType().GetProperty(PropertyName).GetValue(instance);
if (((IComparable)value).CompareTo(otherValue) > 0)
{
return ValidationResult.Success;
}
return new(“The current value is smaller than the other one”);
}
}
Next, we can incorporate this attribute into our view model.
Unset
public class ComparableModel : ObservableValidator
{
private int a;
[Range(10, 100)]
[GreaterThan(nameof(B))]
public int A
{
get => this.a;
set => SetProperty(ref this.a, value, true);
}
private int b;
[Range(20, 80)]
public int B
{
get => this.b;
set
{
SetProperty(ref this.b, value, true);
ValidateProperty(A, nameof(A));
}
}
}
Second Approach: Customizing ValidableObject
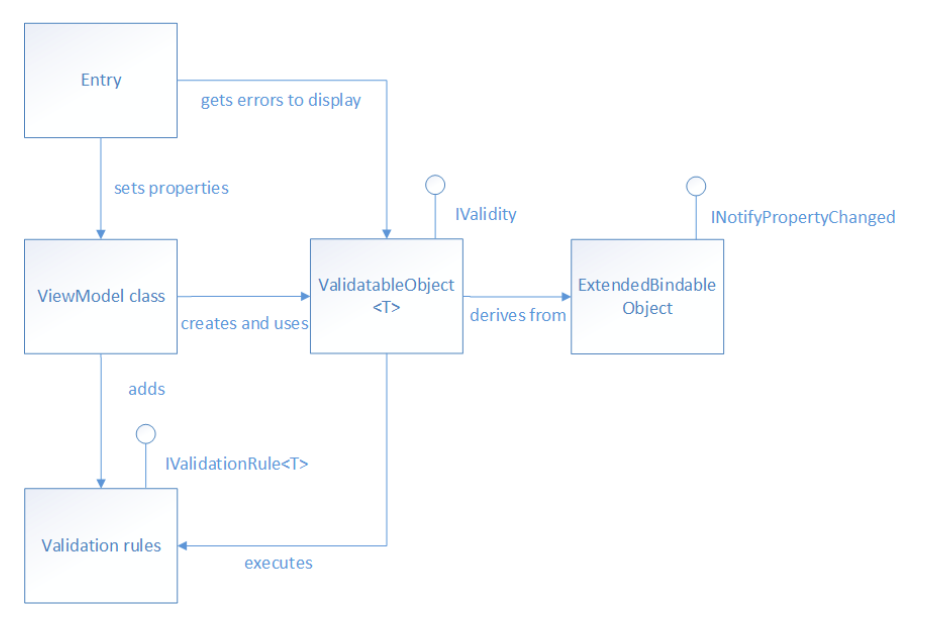
– Properties in the view model that necessitate validation are of type ValidatableObject. Each instance of ValidatableObject has its validation rules appended to its Validations property.
– Validation in the view model is triggered by invoking the Validate method of the ValidatableObject instance. This method retrieves the validation rules and applies them to the ValidatableObject.Value property.
– Validation errors are stored in the Errors property of the ValidatableObject instance, while the IsValid property of the ValidatableObject instance is updated to reflect the success or failure of the validation.
The following code shows the implementation of the ValidatableObject:
Unset
using CommunityToolkit.Mvvm.ComponentModel;
public class ValidatableObject : ObservableObject, IValidity
{
private IEnumerable _errors;
private bool _isValid;
private T _value;
public List> Validations { get; } = new();
public IEnumerable Errors
{
get => _errors;
private set => SetProperty(ref _errors, value);
}
public bool IsValid
{
get => _isValid;
private set => SetProperty(ref _isValid, value);
}
public T Value
{
get => _value;
set => SetProperty(ref _value, value);
}
public ValidatableObject()
{
_isValid = true;
_errors = Enumerable.Empty();
}
public bool Validate()
{
Errors = Validations
?.Where(v => !v.Check(Value))
?.Select(v => v.ValidationMessage)
?.ToArray()
?? Enumerable.Empty();
IsValid = !Errors.Any();
return IsValid;
}
}
Validation rules are specified by creating a class that derives from the IValidationRule interface
Unset
public interface IValidationRule
{
string ValidationMessage { get; set; }
bool Check(T value);
}
– This interface mandates that a validation rule class must include a boolean Check method for performing the necessary validation, and a ValidationMessage property to hold the error message displayed if validation fails.
– The following code example shows the IsNotNullOrEmptyRule validation rule.
Unset
public class EmailRule : IValidationRule
{
private readonly Regex _regex = new(@”^([w.-]+)@([w-]+)((.(w){2,3})+)$”);
public string ValidationMessage { get; set; }
public bool Check(T value) =>
value is string str && _regex.IsMatch(str);
}
So how to add validation rules to a property in the view model:
Step 1: Declare the validated property in the view model. It needs to be type ValidatebleObject.
Unset
public ValidatableObject Email{ get; private set; }
Step 2: Add validation rules to the Validations collection of ValidateObject instance.
Unset
private void AddValidations()
{
Email.Validations.Add(new EmailRule
{
ValidationMessage = “A email is not correct.”
});
}
});
Step 3: Trigger validation when property changes:
Unset
<Entry Text=”{Binding Email.Value}”>
<Entry.Behaviors>
<behaviors:EventToCommandBehavior
EventName=”TextChanged”
Command=”{Binding ValidateEmailCommand}” />
</Entry.Behaviors>
</Entry>
Unset
private bool ValidateEmail()
{
return Email.Validate();
}
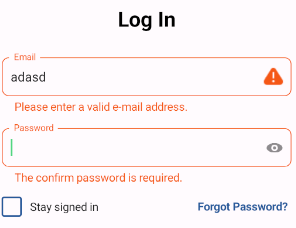
Step 4: Display validation errors
Unset
<material:TextField Title=”Email”
Text=”{Binding Email.Value}”
Keyboard=”Email”
Style=”{x:StaticResource EntryStyle}”>
<material:TextField.Attachments>
<Image Source=”error_container.png” Margin=”0,0,10,0″
IsVisible=”{Binding Email.IsValid, Converter={StaticResource Key=InvertedBoolConverter}}”/>
</material:TextField.Attachments>
<material:TextField.Behaviors>
<mct:EventToCommandBehavior
EventName=”TextChanged”
Command=”{Binding ValidateEmailCommand}” />
</material:TextField.Behaviors>
<material:TextField.Triggers>
<DataTrigger
TargetType=”material:TextField”
Binding=”{Binding Email.IsValid}”
Value=”False”>
<Setter Property=”BorderColor”
Value=”#F55718″ />
<Setter Property=”TitleColor”
Value=”#F55718″ />
</DataTrigger>
</material:TextField.Triggers>
</material:TextField>
Unset
<Label Text=”{Binding Email.Errors, Converter={StaticResource ListToStringConverter}}”
IsVisible=”{Binding Email.Errors, Converter={StaticResource IsListNotNullOrEmptyConverter}}”
FontSize=”14″
TextColor=”#F55718″/>
In summary, we will have a completed flow like this screenshot:
Summary
This article highlights several challenges encountered when developing an enterprise application and offers solutions to address them. To ensure your app can be modified or extended over time, it’s crucial to design it with adaptability in mind. This involves partitioning the app into discrete, loosely coupled components that can be easily integrated. While challenging, this approach guarantees the app remains flexible and maintainable.
Thank you for reading this article. In the next one, I’ll cover topics such as authentication, platform invocation, how to apply async/await in mobile apps, and unit testing …. to help you tackle the challenges of developing an enterprise application. Stay tuned!
Reference:
MAUI Documentation: Link
MAUI blog: Link
MAUI tutorial channel: Link


