1. Introduction
As a front-end developer, you must get used to HTML and CSS. If HTML is a person, then CSS will be a shirt, a pair of pants, a watch, or anything that makes that person look attractive. That is why HTML and CSS are two things that are essential to creating a beautiful website. Talking about CSS, there are a lot of properties that can help you while you are working with it. One of them is “display”. Their values are inline, block, inline-block, table, etc. There are two values you need to consider the most: Flex and Grid.
2. Benefit
Flexbox is a versatile layout model with numerous exciting features:
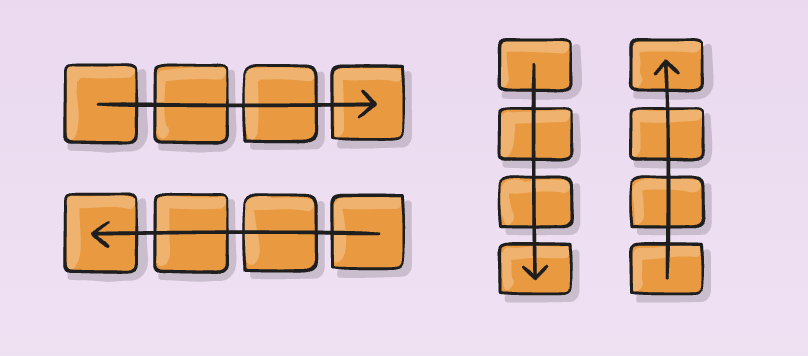
– It allows flexible flow directions, enabling elements to be laid out in any direction, such as leftwards, rightwards, downwards, or even upwards.
– Display order can be reversed or rearranged at the style layer, meaning the visual order can differ from the source and speech order.
– Flexbox supports linear layout along a single (main) axis or wrapped into multiple lines along a secondary (cross) axis.
– Elements can “flex” their sizes to respond to the available space, adjusting their dimensions based on the container’s size.
– Alignment options are available to align elements concerning their container or with each other.
– Flex items can be dynamically collapsed or uncollapsed along the main axis while preserving the container’s cross-size. This allows for responsive and adaptive layouts.
– Flexbox’s combination of features makes it a powerful tool for creating flexible and responsive web layouts, ensuring smooth and adaptable user experiences.
2.1 Advantages of CSS Grid:
CSS Grid offers remarkable flexibility and responsiveness, allowing for the creation of versatile two-dimensional layouts. Its user-friendly nature and broad support across most web browsers make it an excellent choice for developers.
The CSS grid significantly enhances the cleanliness of your markup in HTML, providing you with increased flexibility. Unlike other layout techniques, the CSS grid enables you to adjust the position of items without altering the markup (HTML code).
2.2 Appropriate Use of CSS Grid:
When dealing with intricate design layouts, CSS Grid surpasses the capabilities of the CSS float property. Unlike the one-dimensional layout offered by the CSS float property, Grid provides a more powerful two-dimensional layout with both columns and rows.
Furthermore, CSS Grid proves to be beneficial when creating space or gaps between elements. Leveraging the CSS grid-gap property simplifies spacing two elements compared to using the CSS margin and padding properties, which might complicate the layout.
2.3 The main difference between Flex and Grid:
Flex is mainly supported in one-dimensional layouts because it lacks the flexibility to support large or complex applications (especially when it comes to orientation changing, resizing, stretching, shrinking, etc.).
While Grid can work on a two-dimensional layout, the Grid items are arranged in columns, and you can easily position rows without messing with the HTML code.
In simple terms, you can use Flex in a small-scale layout and should use Grid in a large-scale layout.
3. Flex attributes
The flex property in CSS is a shorthand for flex-grow, flex-shrink, and flex-basis. It exclusively applies to flex items within a flex container. If a container’s item is not a flex item, the flex property will have no impact on that specific item.
This property serves to control the size of flexible items, making it convenient for positioning child elements within the main container. By using the flex property, we can determine how a flex item will shrink or grow to adapt to available space.
3.1 For parent
Before applying all the following properties, you have to set this property: Display: flex.
This creates a flex container that can be either inline or block-level based on the provided value. It establishes a flex context for all its immediate children elements.
Flex-direction: this property will define which direction items in the parent will align.
– row: this is the default value if you don’t assign a value for flex-direction. It will align all children’s items in the x-axis
– row-reverse: the same as “row”, but it will display in the reverse order based on the way you arrange the data
– column: opposite to “row”, it will display items on the y-axis. This is usually commonly used in the main layout of the project or mobile responsive layout
– column-reverse: still display as “column”, but in reverse order
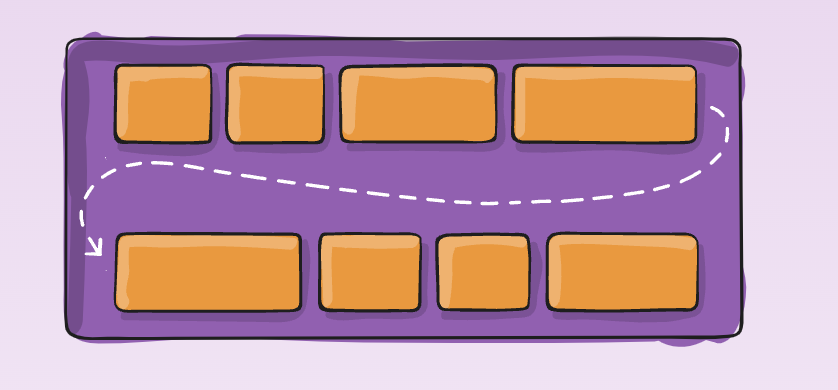
Flex-wrap: this property is usually used to prevent items exceed the width of the parent, and bring all those items to the next line.
– nowrap: this is the default value, which means all items will try to fit into one line. If you don’t set the width of each item with a fixed value, then all items will shrink their width to try to fit all items into one line. However, if you do, it might overflow the parent and in the worst case, it might break the whole layout
– wrap: an item that exceeds the limit of a parent, will auto-go to the next line
– wrap-reverse: the same with “wrap”, but instead those items go to the next line at the bottom, it will create a new line on top
Flex-flow: this is just a shorthand representing flex-direction and flex-wrap.
– Syntax: .
– For example flex-flow: column wrap-reverse
– And of course, the default value of this: row nowrap
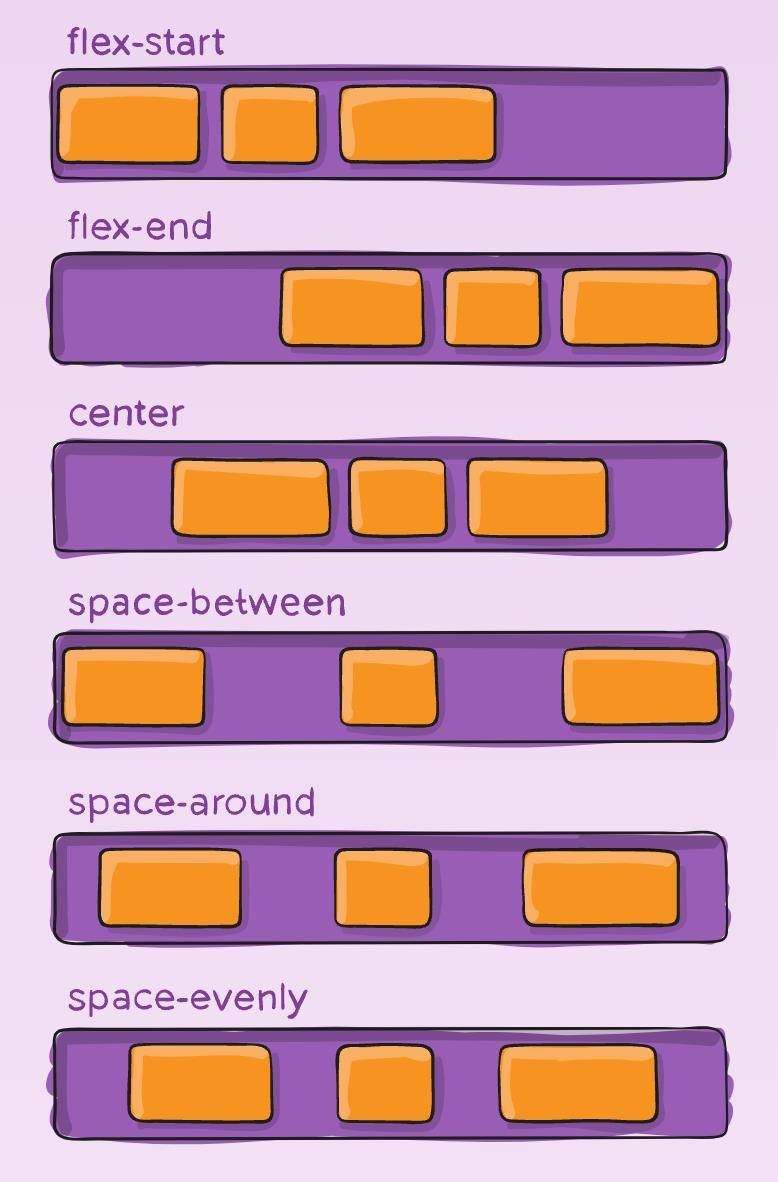
Justify-content: align items in the main axis of parent. If your flex-direction is row, then justify-content will apply on the x-axis and vice versa.
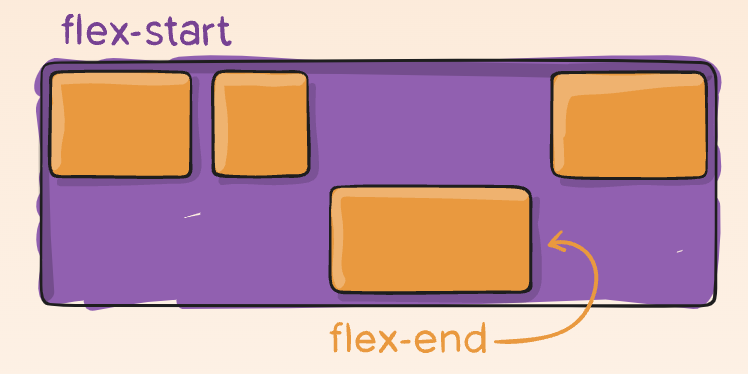
– flex-start: This is a default value, align the item at the beginning of the main axis
– flex-end: align objects at the end of the main axis
– center: align items in the center
– space-between: align the first and final item at the beginning and at the end of a row, the things in between will align with the same space between
– space-around: Arrange all items with the same space including the beginning and the last row
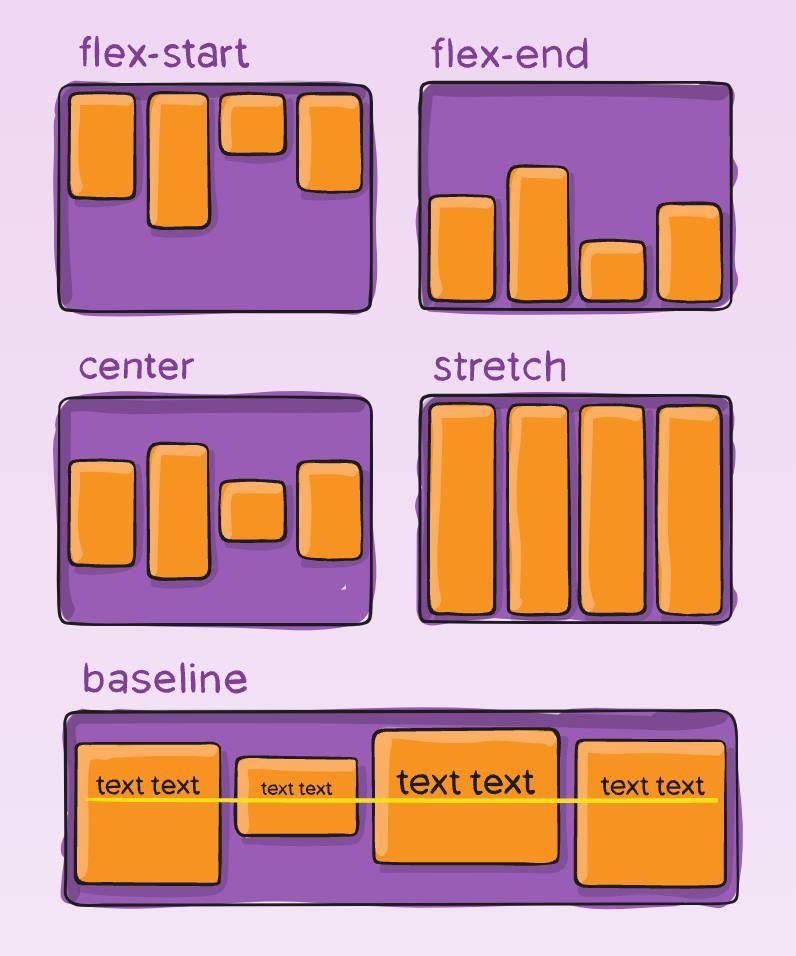
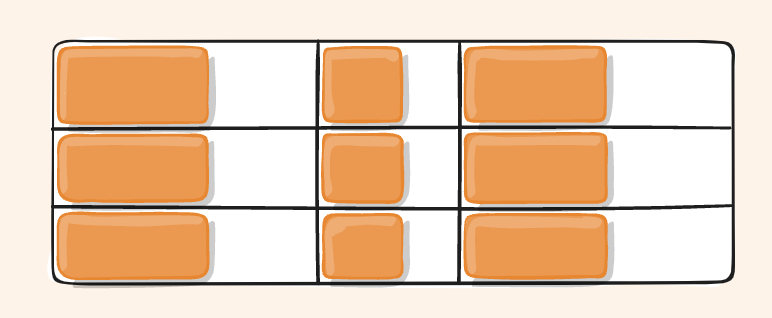
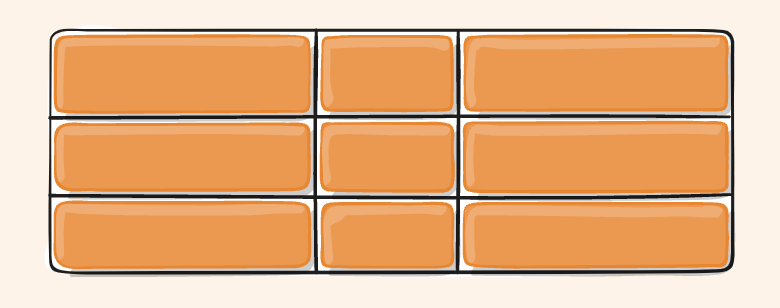
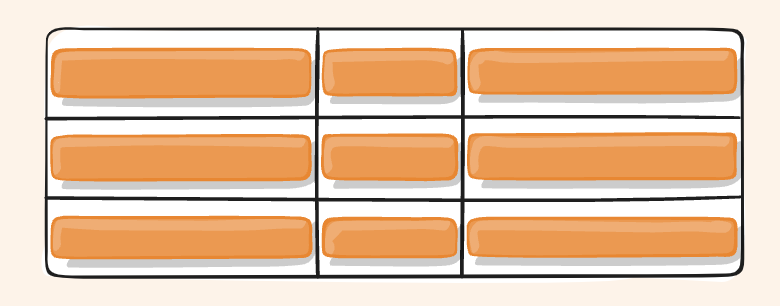
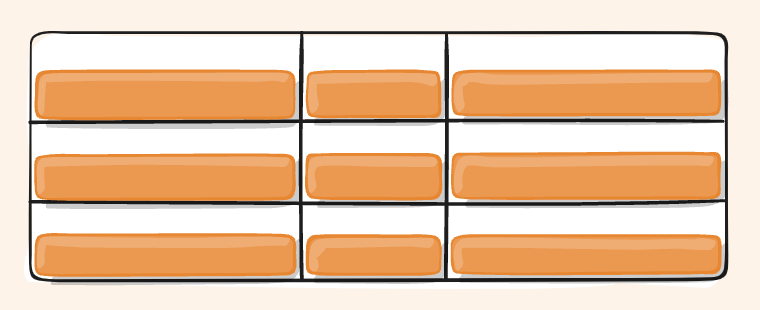
Align-items: Opposite to justify-content, it will align items in the other axis.
– stretch: this is the default value, try to fit the container
– flex-start, flex-end, center, space-between, space-around, etc have the same functionality as justify-content above
– baseline: items are aligned based on their baseline align
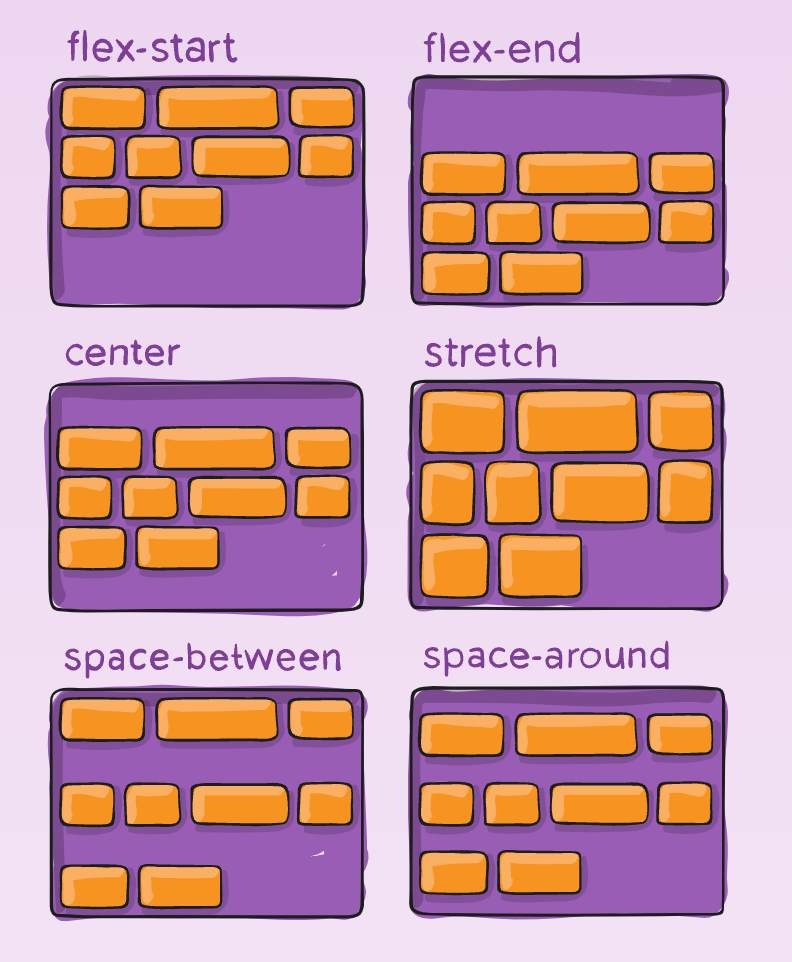
Align-content: you only need this property when flex-wrap: wrap, which means there is more than one line because this property will align multiple lines in the container.
– normal: this is the default value, which content will stay in their default position
– flex-start, flex-end, etc is the same with justify-content
Gap: This is for space between items. Gap including row-gaps and columns-gap. You can write this as shorthand or you can write them separately:
– gap: 10px 20px *row-gap column-gap*
3.2 For children
Speaking of flex, we have to think about flex-grow, flex-basis and flex-shrink right away, because these three properties will define how an item will display. When you define display: flex, their value will be
– flex-grow: 0
– flex-shrink: 1
– flex-basic: auto
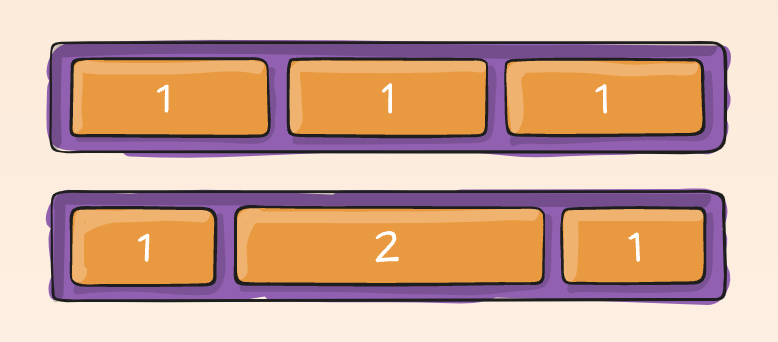
Flex-grow: The default value is 0, which means they won’t extend to fit the container. They will take as much space left as possible if you set it to 1, while the other item is set to 0. If any other item sets flex-grow too, then it will compare which value of flex-grow is larger, which more significant will take more space than the other (Note: negative value is invalid).
Flex-shrink: Default value is 1. When the total width of items is larger than the container, you will need this property to shrink items to fix all items inside the container. The larger value, the smaller it is. For example, if the first item is set flex-shrink: 2, which means it will be smaller 2 times with the other set to 1 (Negative number is invalid).
Flex-basis: Default value is ‘auto’. You can consider this as the default width of the item. For example, if you set flex-basis: 1000px, it will try to take as much space as possible, not always 1000px, because we just declare its width as 1000px, not width: 1000px.
But, that is when you set flex-shrink: 1, which means the item will try to fit the container, when you set flex-shrink: 0 that means you tell “you cannot shrink no matter what”, then it will behave like min-width: 1000px.
If you don’t need flex-basic, then just set auto or don’t set anything
– Flex: just a shorthand for the three properties above.
flex:1 or flex: 1 1 auto *flex-grow flex-shrink flex-basis* are the same.
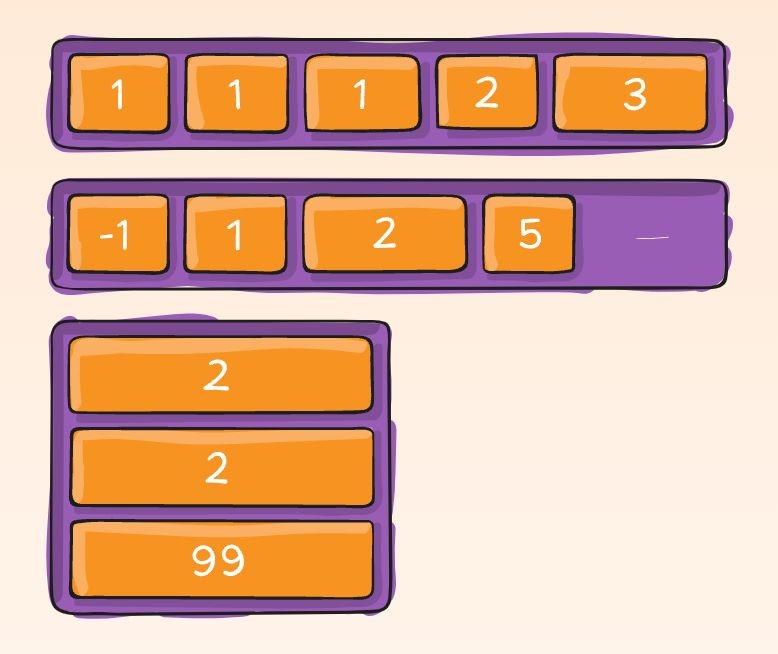
– Order: for example, when you don’t want to arrange items in the original order, you can declare this property to arrange any item in any order that you want.
Align-self: if the parent doesn’t set align-items or you want to align an item in a different position, you can use align-self to align specific item start, center, or end. The value is the same as align-items: flex-start, flex-end, center, baseline, etc.
4. Grid attributes
The CSS grid property responsible for containing grid items/elements is called the “grid container.” To create a CSS grid container, we utilize the display property and set it to the grid. This allows us to establish a grid context, where grid items can be organized and positioned efficiently.
4.1 For parent
– Display: grid | inline-grid
This is a required step before you can use any grid property. grid is for vertical direction and inline-grid is for horizontal direction.
– Grid-template-columns: define several columns and their size of it in the grid container
e.g: repeat(5, 1fr)
1fr 1fr
minmax(10px, 1fr) 3fr
50px auto 100px 1fr
in the grid container, there is a special unit named ‘fr’, which we will discuss more later.
– Grid-template-rows: the same for grid-template-columns, but for row.
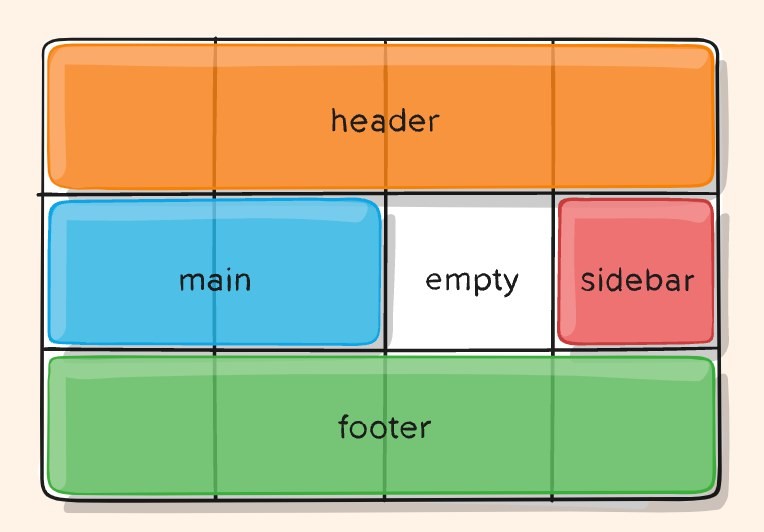
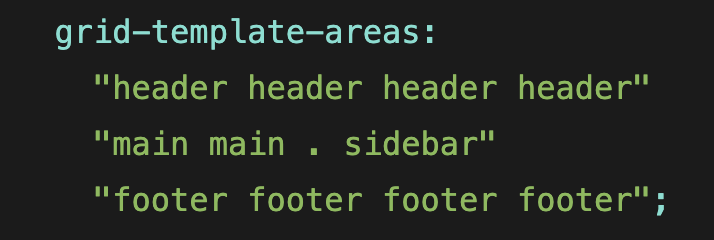
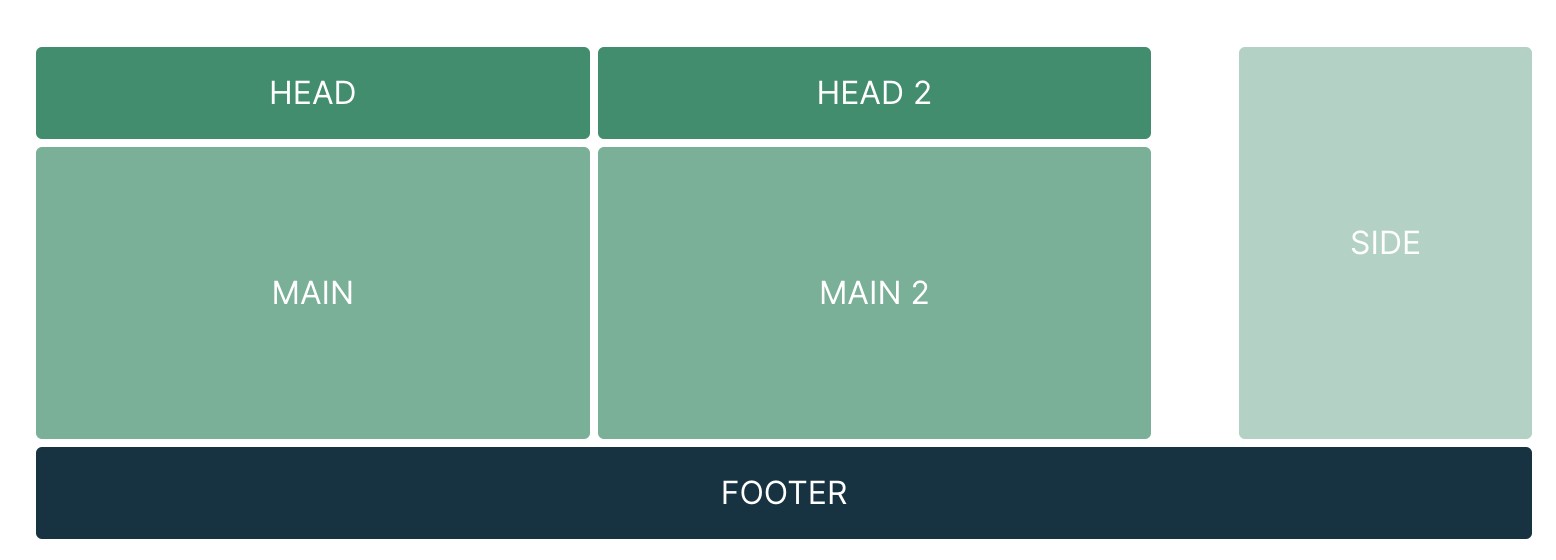
– Grid-template-areas: when you meet a complex layout, we need this. To work with this property, you will need a ‘grid-area’ which we will mention later.
For example, this layout can be used with ‘grid-template-areas’:
Grid-template: just a shorthand for grid-template-columns and grid-template-rows
– grid-template: /.
Example:
grid-template: 100px fr / repeat(4, 1fr)
grid-template: [header-top] “a a a” [header-bottom]
[main-top] “b b b” 1fr [main-bottom]
/ auto 1fr auto;
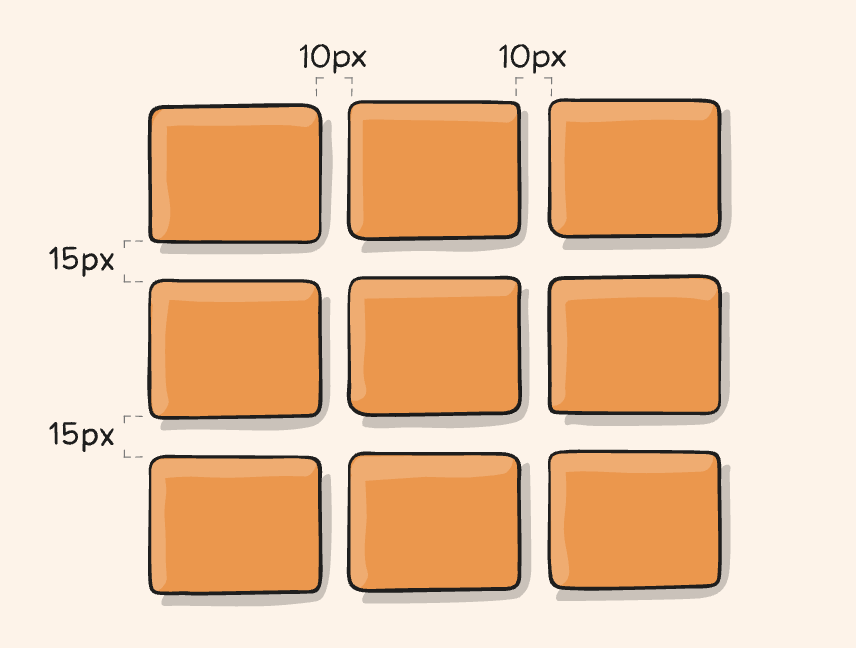
Column-gap, Row-gap: this is just a new property to replace ‘grid-column-gap’, and ‘grid-row-gap’. It defines the gap between columns or rows
– column-gap: 10px;
– row-gap: 15px
Gap: a shorthand, replacement for old property ‘grid-gap’
– gap: .
Justify-items: align items inside a container in the row axis
– start
– end
– center
– stretch
Align-items: opposite to justify-items, it aligns items in the column axis
– stretch (default)
– start
– end
– center
– baseline
Place-items: define value for align-items and justify-items. If you set one value, it will be used for both property
– place-items: place-items: /.
Justify-content: align whole content in row-axis
– start
– end
– center
– stretch
– space-around
– space-evenly
– space-between
Align-content: the same for justify-content but in column-axis.
Place-content: just a shorthand for /.
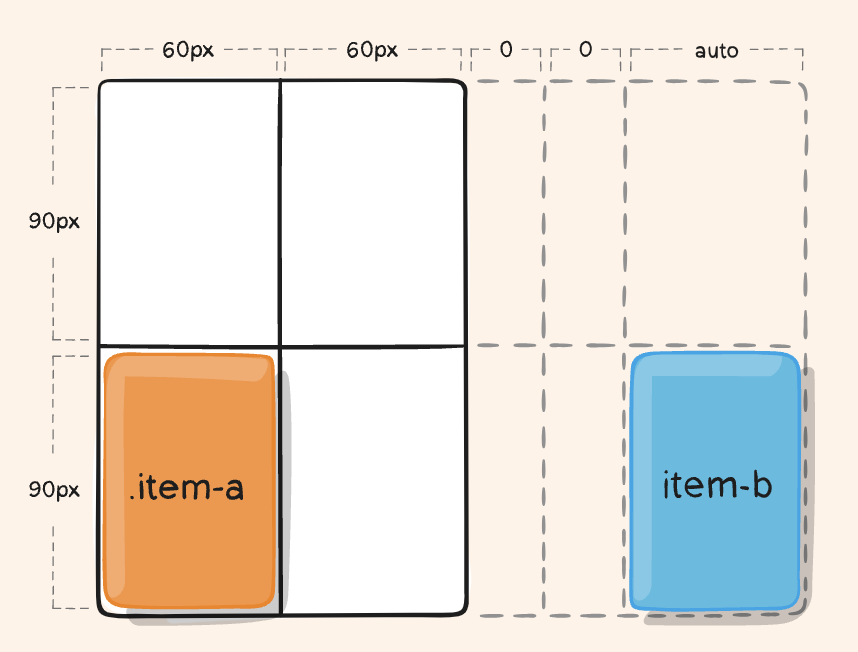
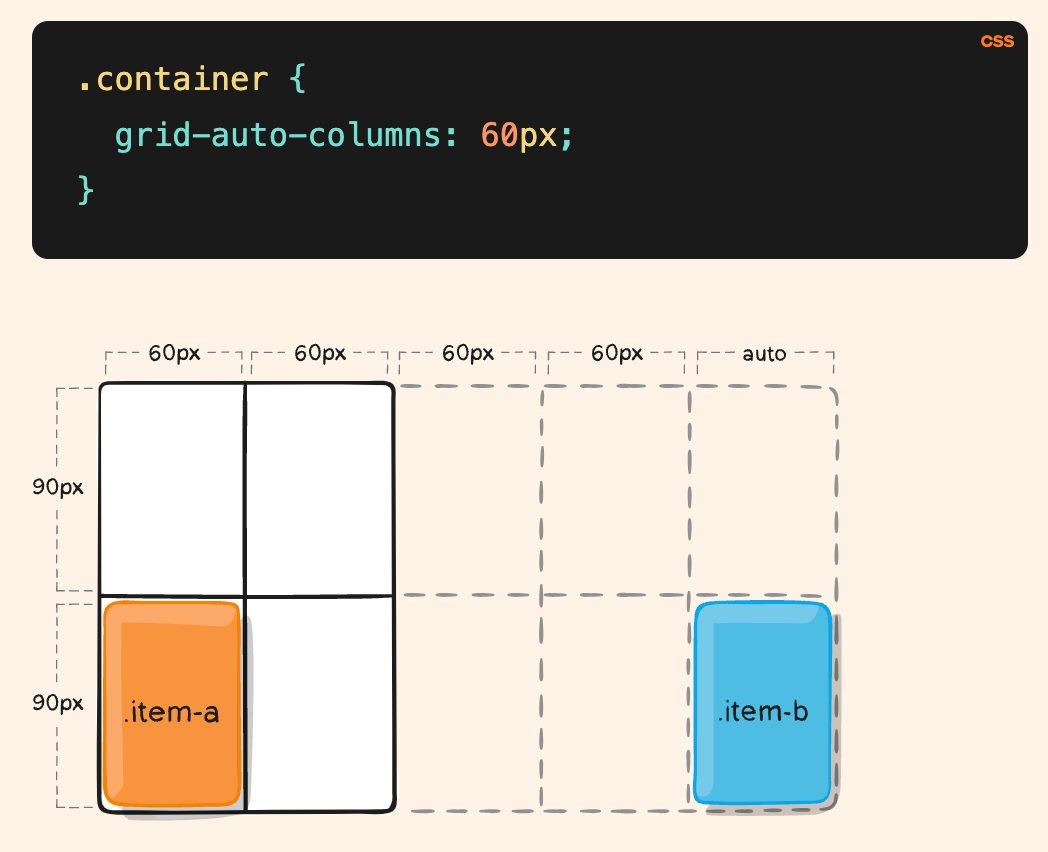
Grid-auto-columns, grid-auto-rows: in case you define grid-template-columns with 3 columns, but while working, there are 4 or more columns than expected, those will have a width too small by default. That is why you should use this property, to define a default width for all columns (the same for grid-auto-rows).
No grid-auto-columns Define grid-auto-column
Define grid-auto-column
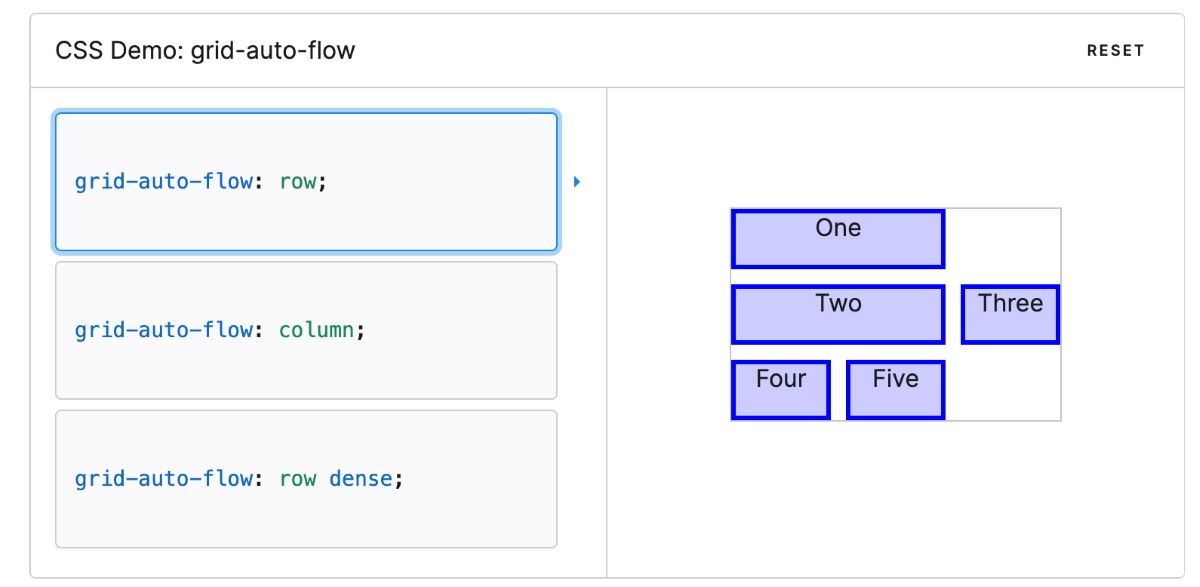
Grid-auto-flow: just like flex-direction in flex box, this property behaves the same
– column
– row
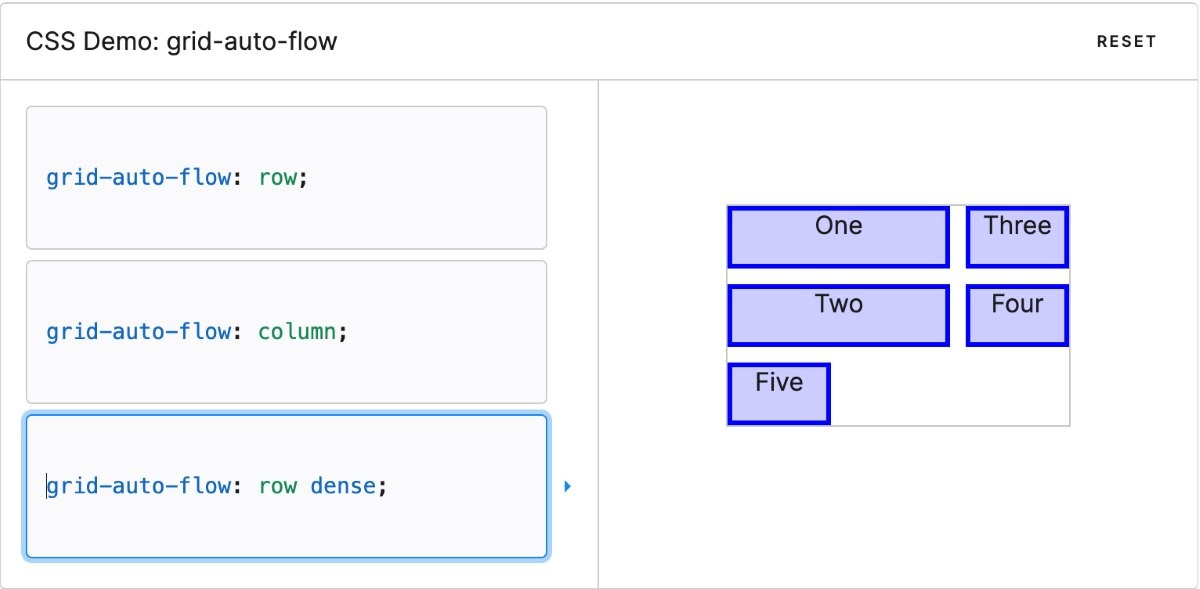
– dense: this is a special value and it is not recommended to use. It is used an autofill algorithm to auto-align small items fixed with blank spaces left, it will mess up the order unexpectedly.
Explain: Because flow is row, it will align from left to right, because Two is too big, so it will go to the next line, leaving a space. Luckily, Three has width enough for that space, although Four and Five have the same width as Three but Three is the first one that fits that space so ‘dense’ will align Three to that space. Next, because Three is now moved before Two, leaving a blank space, Four will be next, is replace to that space, and so on.
– Grid: is just a shorthand for all grid-template-rows, grid-template-columns, grid-template-areas, grid-auto-rows, grid-auto-columns, and grid-auto-flow. It is not recommended to write too short because it might confuse other team members.
4.2 For children
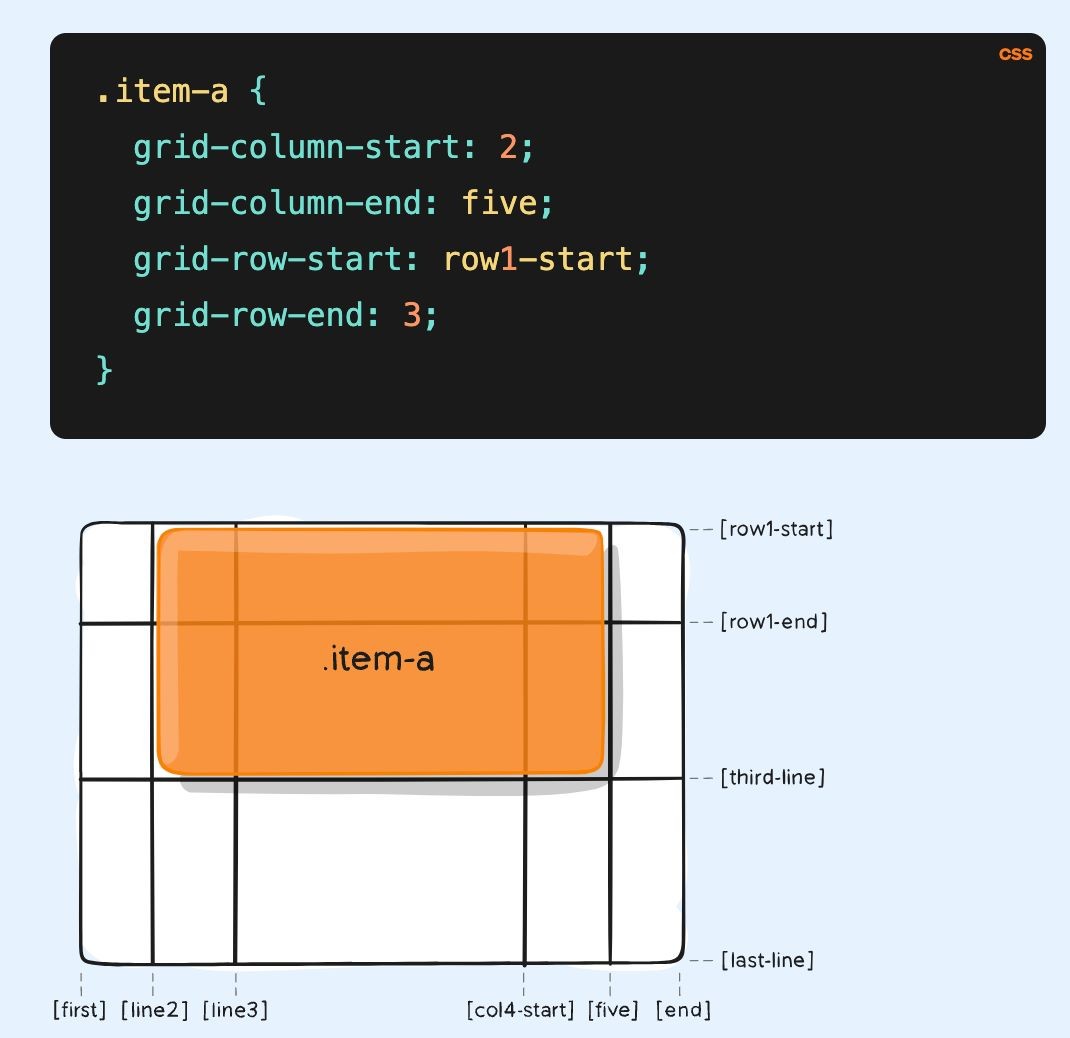
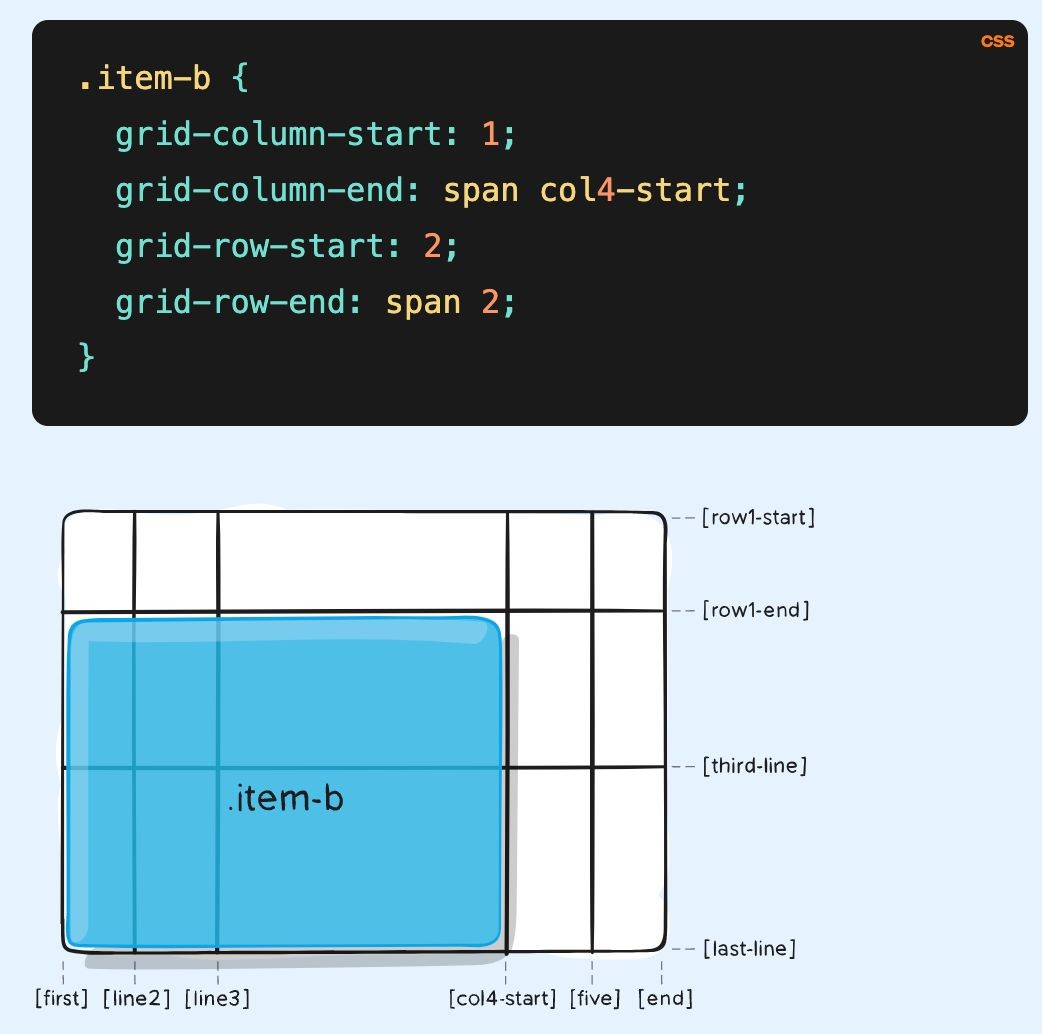
Grid-column-start, grid-column-end, grid-row-start, grid-row-end: when you create a grid container, you can choose how much space each item will take by using this property.
– . Can represent either a numeric value, referring to a grid line with a number, or a descriptive name, referring to a grid line with a given name.
– span: Specifies that the element will extend across a specified number of grid tracks.
– span: Specifies that the element will extend until it reaches the next line associated with the given name.
– auto: Signifies automatic placement of items on the grid. This can involve automatic spanning or a default span of one track.
– Grid-column, grid-row: shorthand for the above property
grid-column: /.
– Grid-area: Previously, we have mentioned grid-template-area, to use it, we will need grid-area to name the item. You can name anything you want, but then you have to remember to write in grid-template-areas
It is also a shorthand:
grid-area: ///.
– Justify-self: align item inside the cell in row-axis
stretch (default value)
start
end
center
– Align-self: the same with justify-self but in column-axis.
– Place-self: a shorthand for /.
– Special unit (fr): fr is a fractional unit and 1fr is for 1 part of the available space. You can imagine that each fr will take the same space as the other, for example, grid-template-columns: 1fr 1fr 1fr, then it would be divine to 3 and each fr is now equal to 33,333% (sth like that).
If there are other columns with other values besides fr, it will prioritize other values first, then any available space left will divide into many equal spaces for each fr unit.
grid-template-columns: 1fr 1fr 40px 20%;
5. Applying to real UI (some examples)
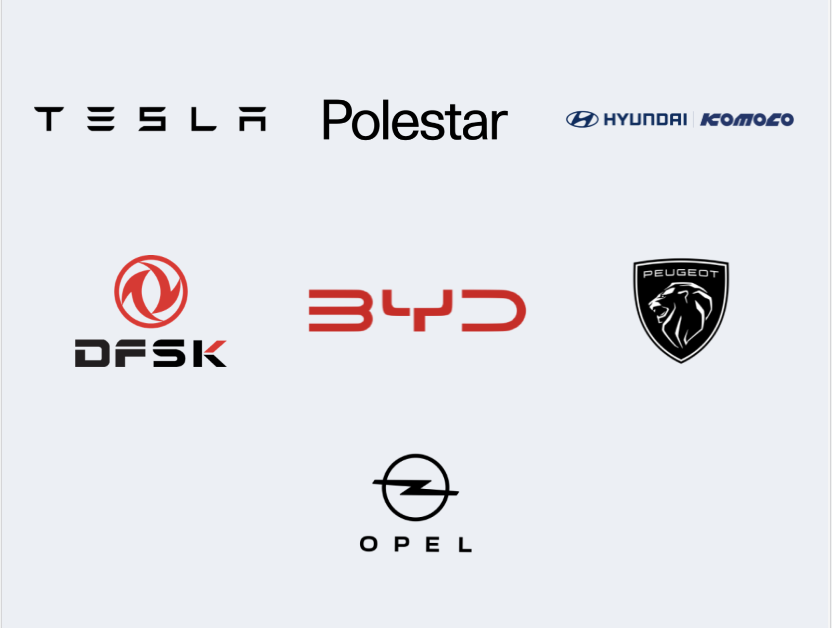
Starting with this layout, we have 7 car logos and we have to align them from left to right and the last one will be in the center. What would you do?
There are three ways to do it based on my experience
– First way: it is also a cheat way, only apply if you have those data locally, you can render three div, the first two div contain 3 logos, the last div you can center the last logo.
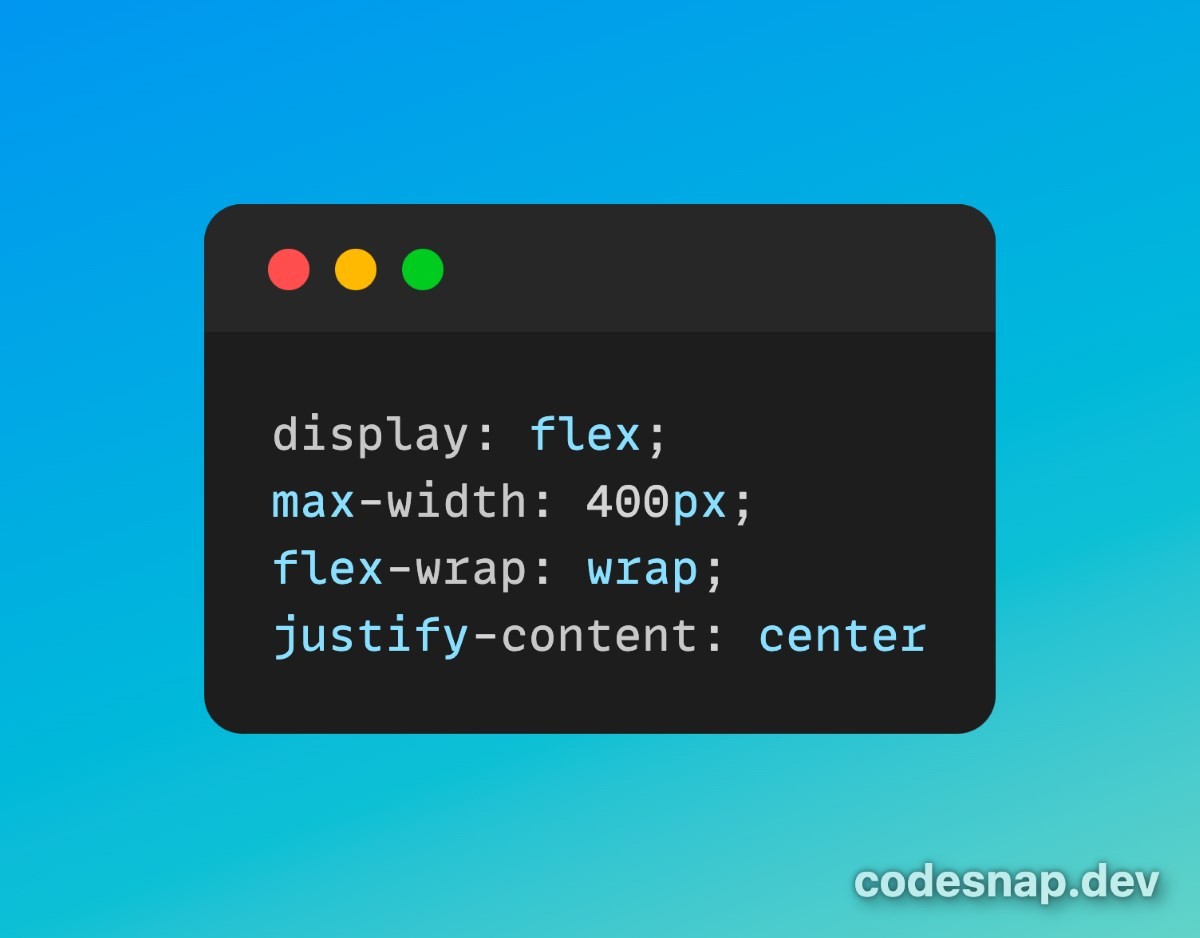
– Second way: Using flex, we use data from the backend, render from left to right, use flex-wrap: wrap to automatically align item to the next line, and finally, use justify-content: center.
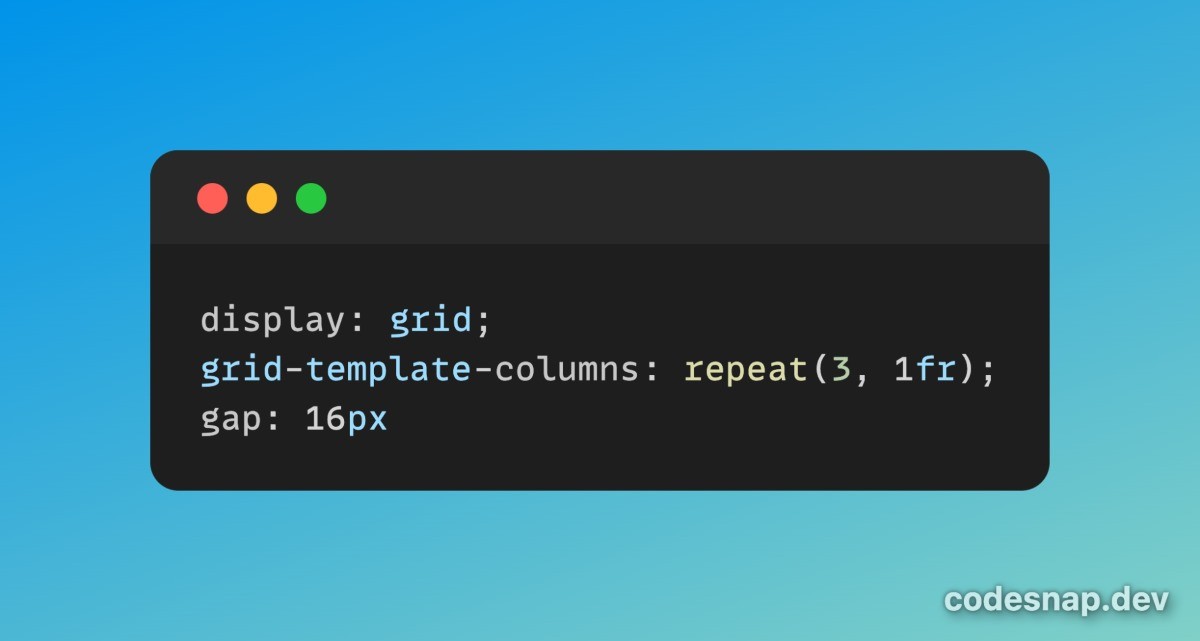
– Lastly, use grid and grid-template-columns to declare 3 columns, and for the last item, use grid-column-start: 2 to let it align from the second column.
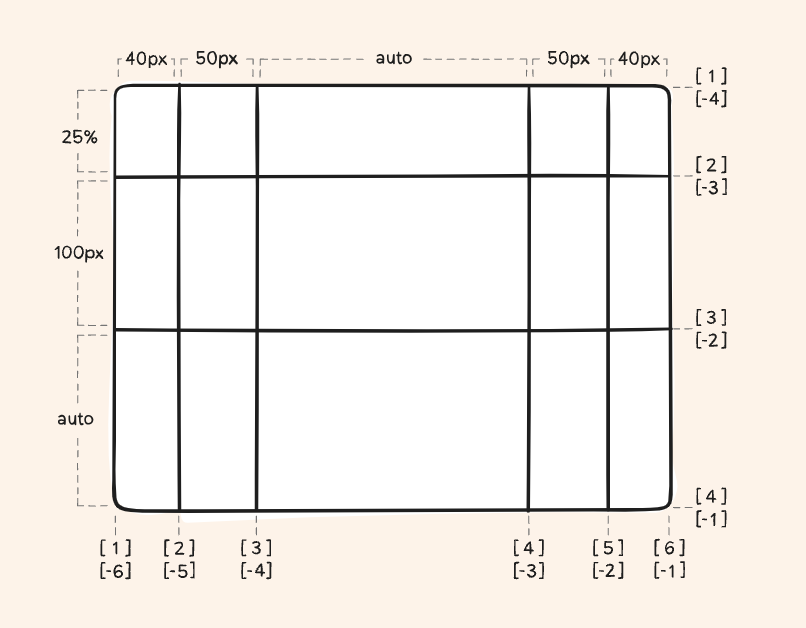
The below one is just an example with a full description for grid-template-columns/ grid-template-rows.
grid-template-columns: [line1] 40px [second] 50px [line3] auto [col4-start] 50px [five] 40px [end];
grid-template-rows: [row1-start] 25% [row1-end] 100px [third-line] auto [last-line];
6. Overview
In summary, Grid is best suited for creating grid-based layouts, while Flexbox is ideal for aligning and distributing elements within a single dimension. Both are essential tools in modern web design.
Our front-end development team has completed hundreds of successful projects, delivering proven expertise. Saigon Technology’s expert developers conquer even the toughest front-end challenges head-on. Looking for front-end development support? Contact us today — we’re ready to help!
References
https://www.javatpoint.com/css-flex-property
https://www.tothenew.com/blog/a-complete-guide-to-css-grid-layout/
https://css-tricks.com/snippets/css/a-guide-to-flexbox/#aa-background
https://betterprogramming.pub/flexbox-align-items-and-align-content-a60b6f8451e3
https://css-tricks.com/understanding-flex-grow-flex-shrink-and-flex-basis/
https://css-tricks.com/snippets/css/complete-guide-grid/
https://developer.mozilla.org/en-US/docs/Web/CSS/grid-auto-flow


