1. Introduction
1.1. Overview of React hooks
React Hooks introduced in React 16.8, revolutionized stateful logic in functional components. They are functions enabling state usage without class components. Core hooks include useState for state management and useEffect for side effects. Additional hooks like useContext and useReducer offer context access and alternative state handling. Custom hooks make your code reusability. Embrace the power of hooks for cleaner, more efficient React development.
1.2. Importance of using hooks in React
- Simplified State Management: Hooks, like useState, streamline state management, making it more concise and eliminating the need for class components.
- Enhanced Readability: Hooks localize logic, improving code readability and making it easier to understand component behavior.
- Reusability with Custom Hooks: Custom hooks facilitate logic encapsulation, enabling easy code reuse across multiple components.
- Functional Components Embrace: Hooks empower functional components with local state and lifecycle capabilities, promoting functional programming.
- Efficient Side Effect Handling: useEffect manages side effects efficiently, simplifying tasks like data fetching and DOM manipulation.
- Performance Optimization: Hooks like useCallback and useMemo optimize performance by memoizing functions and values.
- Gradual Migration: Hooks allow smooth transition from class components to functional components with a clear migration path.
- Community Support: Widely adopted, hooks have extensive community support with abundant resources and best practices.
2. Some advanced hooks
In this blog, I will present these hooks: useId, useDeferredValue, useTransition, useImperativeHandle, useLayoutEffect and how they work.
2.1 useId
– useId is a specialized React Hook designed to create distinctive and exclusive identifiers that can be utilized for enhancing accessibility attributes within your components. This hook becomes particularly valuable when employed in the following scenarios:
– When we use useId:
- Generating distinct identifiers tailored for accessibility attributes.
- Crafting identifiers for a collection of interconnected elements.
- Defining a shared prefix to unify the identifiers generated.
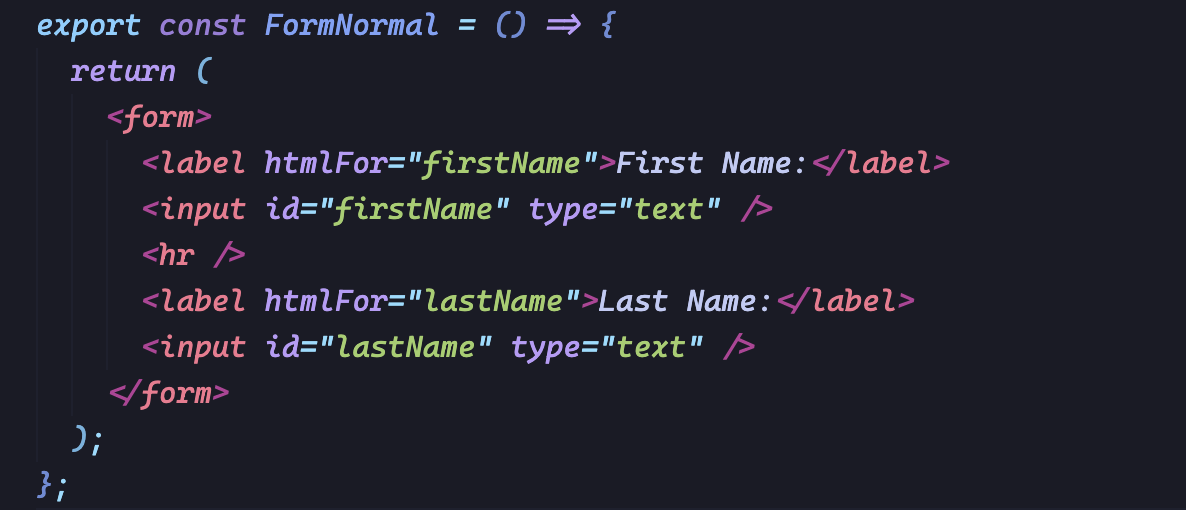
– Compare with old ways:
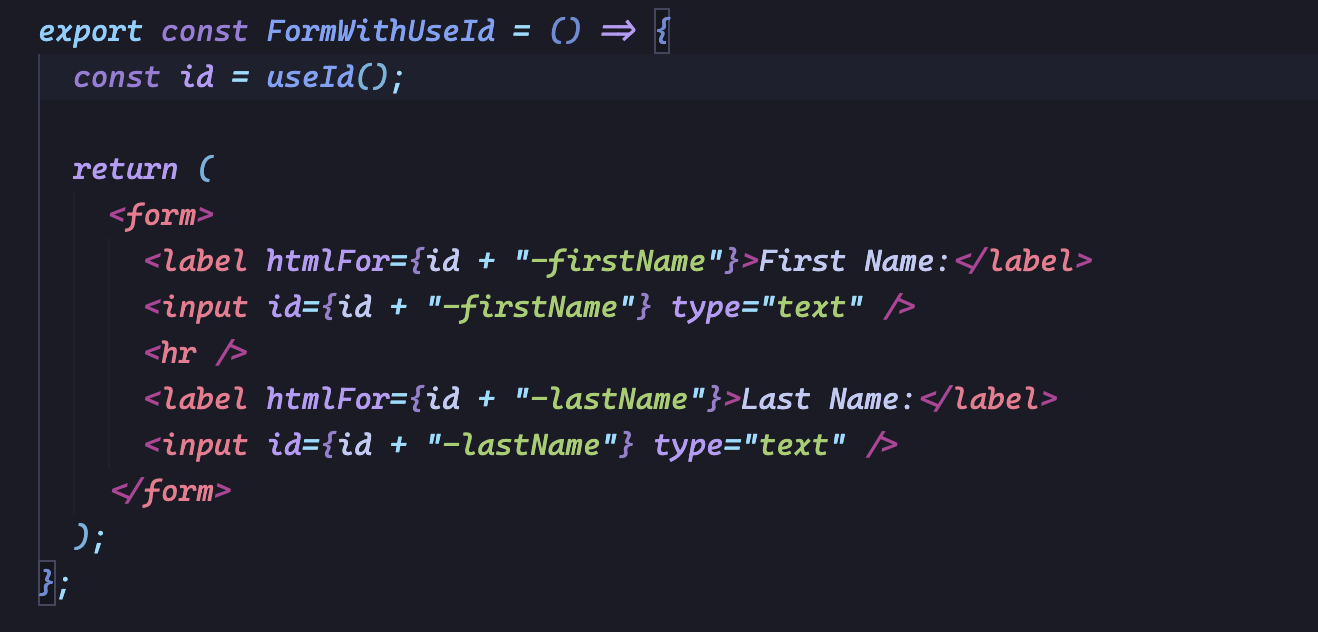
– In typical HTML, the aforementioned structure would be employed. Nonetheless, directly embedding IDs in this manner is not considered a favorable approach within the React framework. This is due to the potential scenario where a component could be rendered multiple times on a single page, leading to the requirement of unique IDs. Rather than statically assigning an ID, the recommended course of action is to generate an exclusive identifier using the useId utility:
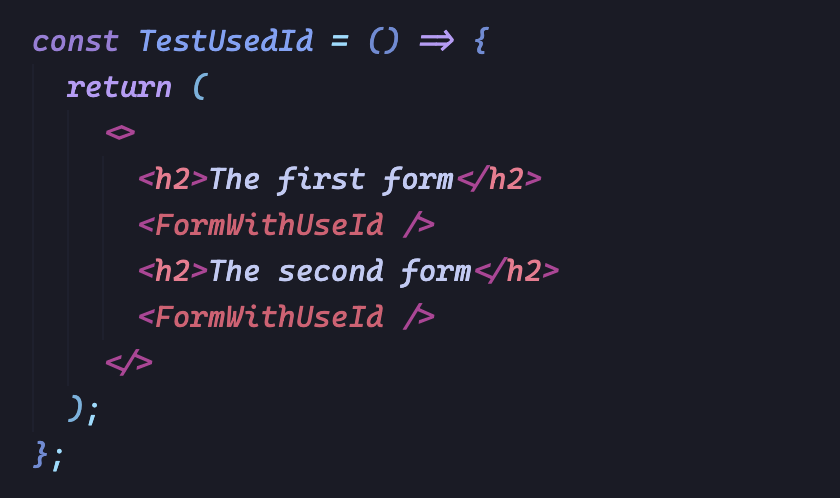
– Now, even if FormWithUseId appears multiple times on the screen, the generated IDs won’t clash.
2.2 useDeferredValue
As React continues to evolve, so do its capabilities for creating performant and responsive user interfaces. One of the latest additions to the React ecosystem is the useDeferredValue hook, introduced as part of React 18 and aimed at enhancing the potential of concurrent rendering.
Understanding Concurrent Rendering:
– Before we delve into useDeferredValue, it’s crucial to grasp the concept of concurrent rendering. Traditional rendering in React works sequentially, where updates are processed one after another, potentially causing delays in user interactions and rendering bottlenecks.
– Concurrent rendering, on the other hand, introduces a more efficient approach. It allows React to work on multiple tasks concurrently, optimizing the user experience by ensuring that critical updates are prioritized, rendering remains smooth, and interactions feel responsive. Concurrent rendering is particularly beneficial for applications that deal with complex and dynamic user interfaces.
One of the hooks that enables the power of concurrent rendering is useDeferredValue. This hook is designed to help manage the timing of updates to specific values, making it possible to defer rendering until more opportune moments. By doing so, React can prioritize rendering more time-sensitive or high-priority updates, resulting in a smoother and more responsive user interface.
To use useDeferredValue, you simply wrap a value with this hook. React will then prioritize rendering updates to other parts of the application before rendering the deferred value. This ensures that if there are other critical updates or computations occurring, they won’t be blocked by rendering the deferred value.
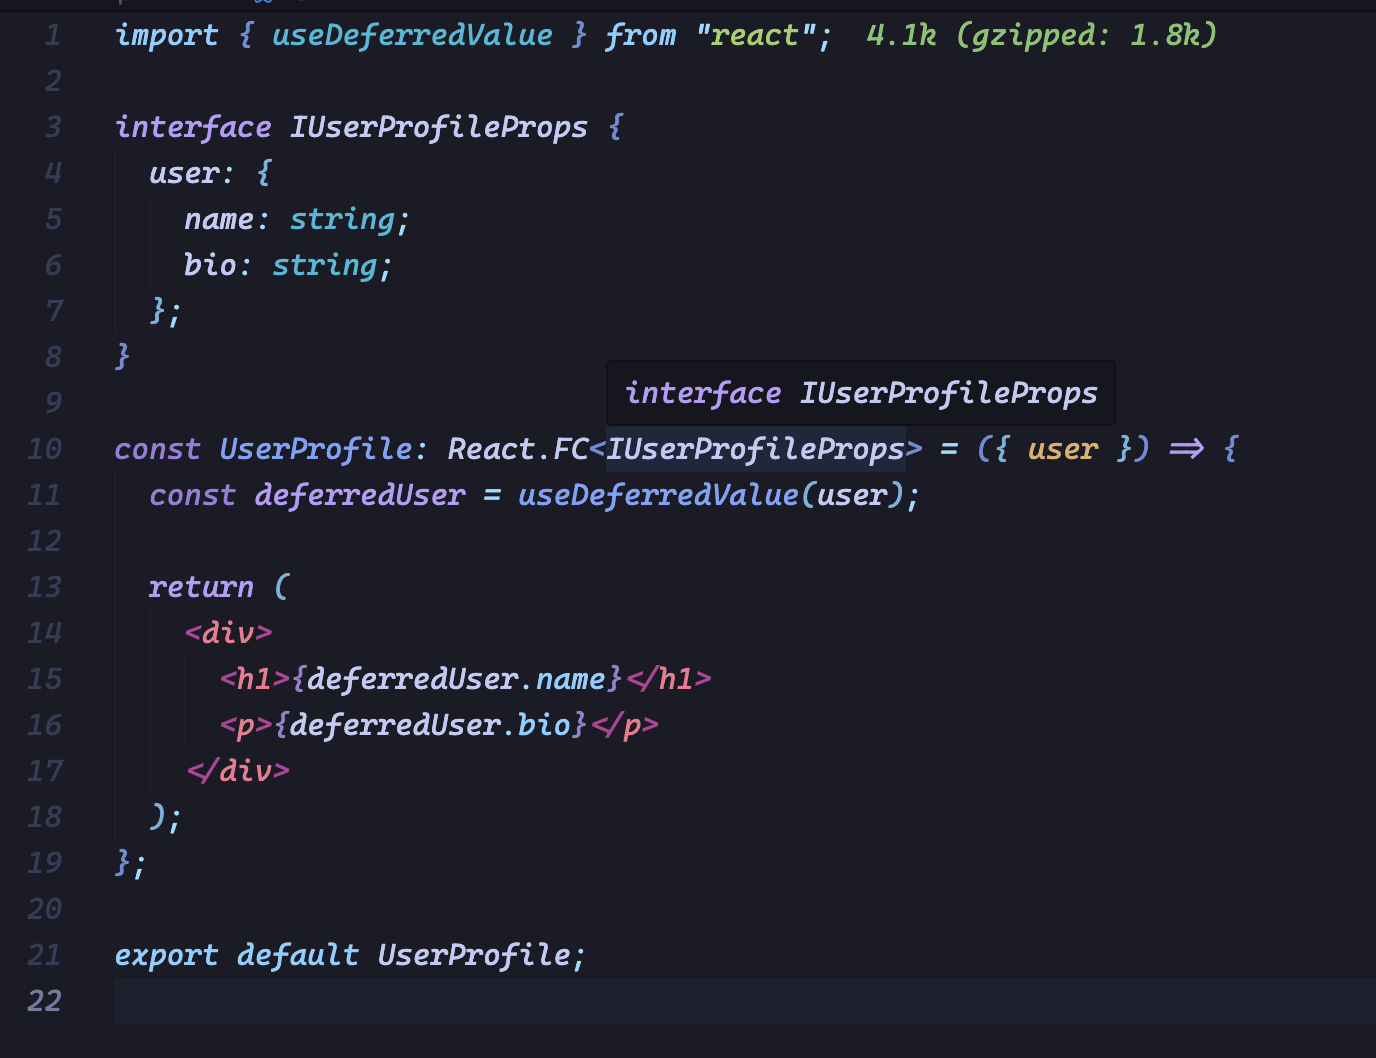
Here’s a basic example to illustrate the concept:
In this scenario, the rendering of the UserProfile component will be deferred and processed after higher-priority updates. As a result, the user interface remains responsive even if there are other intensive tasks taking place concurrently.
Use Cases for useDeferredValue:
– Data-Intensive Applications: When dealing with large amounts of data or complex computations, deferring less critical updates can ensure that the user interface remains fluid and interactions are uninterrupted.
– Optimizing User Experience: By using useDeferredValue strategically, you can prioritize rendering critical information or interactions, enhancing the perceived performance of your application.
– Dynamic User Interfaces: Applications with dynamic user interfaces that frequently update can benefit from useDeferredValue to prevent UI freezes during rendering.
The useDeferredValue hook exemplifies React’s commitment to continually improving the way we build user interfaces. By incorporating this hook into your advanced React toolkit, you can harness the potential of concurrent rendering and ensure your applications provide a seamless, responsive, and engaging user experience.
2.3 useTransition
We need to understand some concepts about useTransition.
– Understanding Asynchronous Updates: In modern web applications, it’s common to encounter asynchronous operations such as data fetching, API calls, or state updates that might take some time to complete. These operations can introduce potential issues in the user interface, such as flickering, delayed rendering, or a jarring user experience. This is where the useTransition hook comes into play.
– The useTransition hook, allows you to coordinate asynchronous updates to your UI in a controlled manner. By utilizing this hook, you can ensure that transitions between different UI states caused by asynchronous tasks are smooth and seamless, improving the overall user experience.
How useTransition Works:
– To utilize useTransition, you need to import it from the ‘react’ library and then invoke it within your component. The hook returns an array with two elements: a boolean value indicating whether a transition is pending, and a function called startTransition.
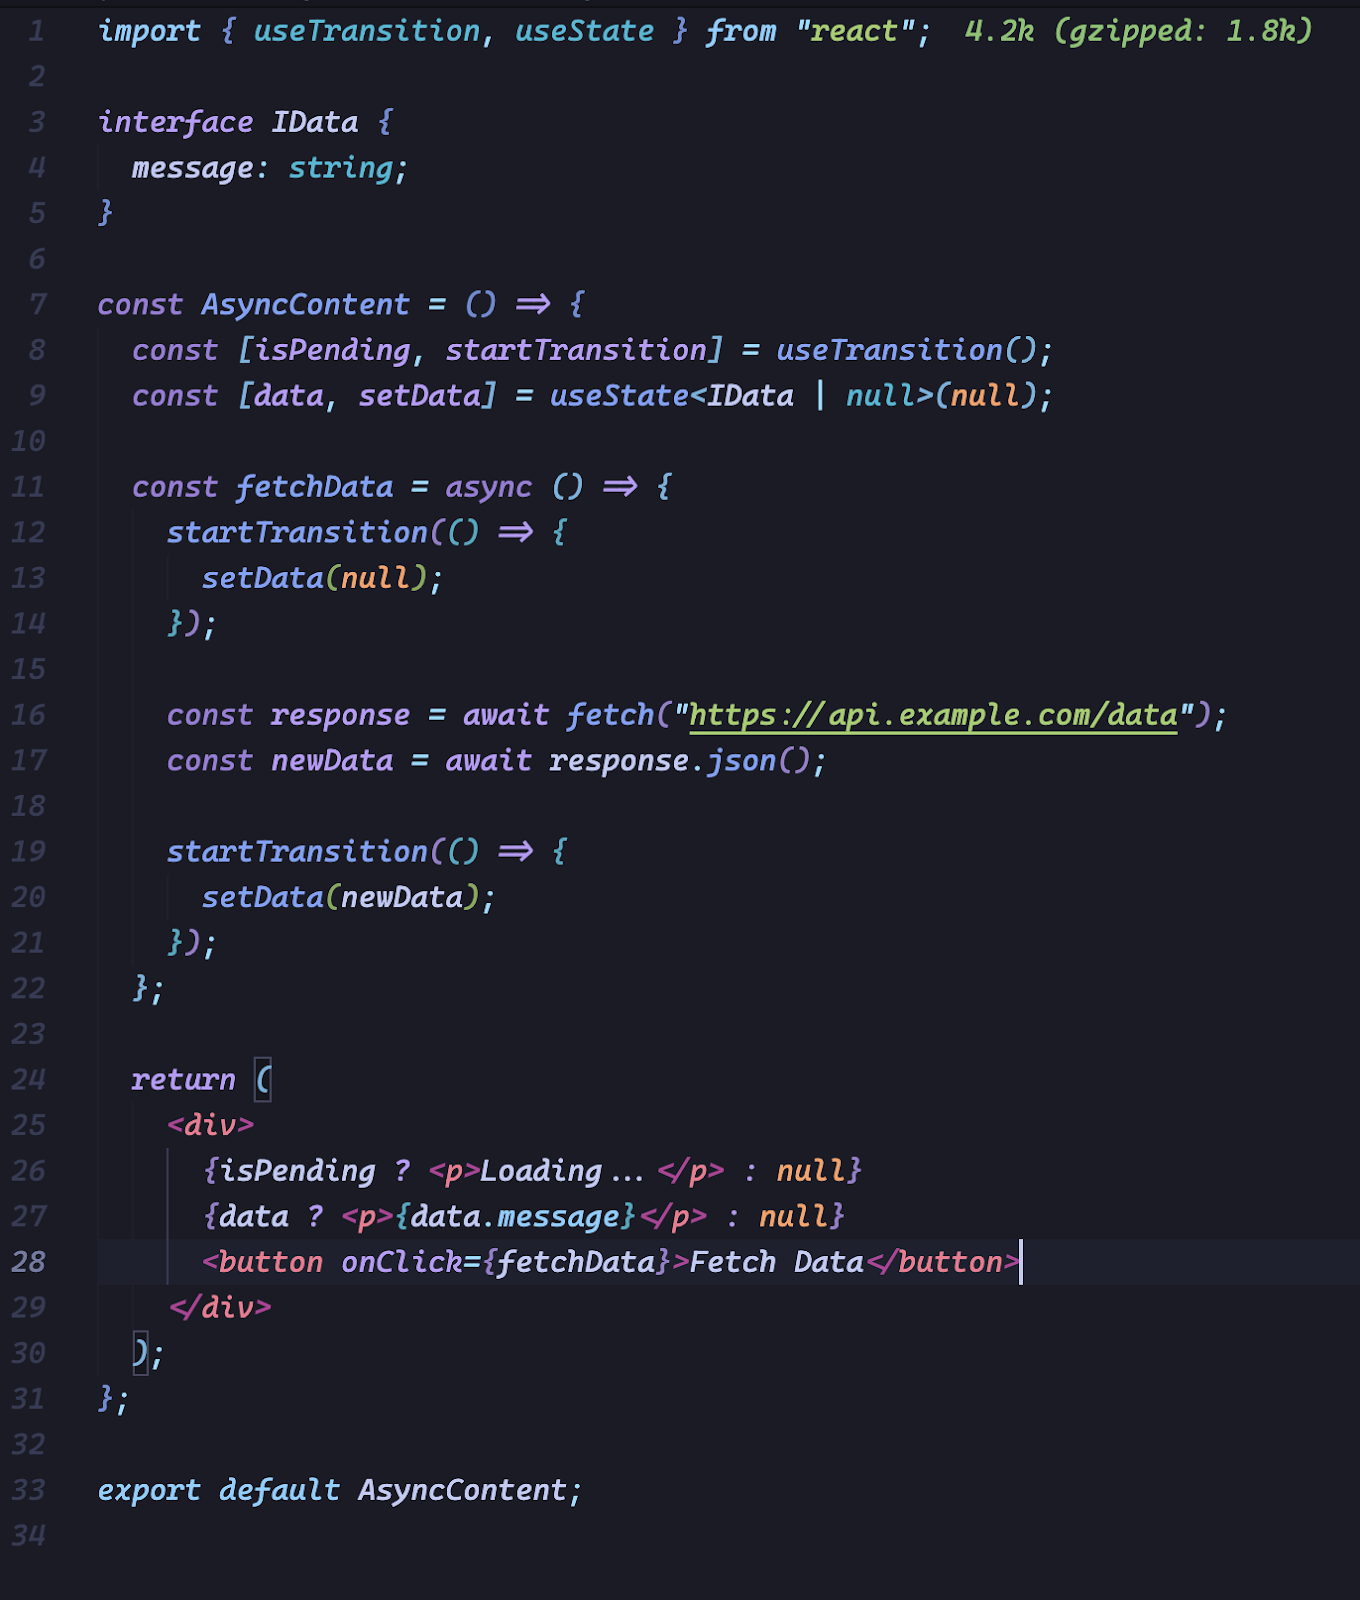
Here’s a basic example of how you might use useTransition to manage asynchronous data fetching:
In this example, useTransition ensures that the UI remains responsive and avoids flickering when transitioning between the loading state and the fetched data state.
The useTransition hook offers several benefits, including:
– Smooth Transitions: By coordinating asynchronous updates, useTransition helps prevent flickering and abrupt UI changes during data fetching or other asynchronous operations.
– Enhanced User Experience: With smoother transitions, users can interact with your application more comfortably, leading to a more engaging and enjoyable experience.
– Reduced Jank: The hook’s ability to manage updates and transitions mitigates jank and ensures that the user interface remains responsive and visually appealing.
The introduction of the useTransition hook is a significant step forward in React’s quest for improved performance and user experience. By integrating this hook into your toolkit, you can effectively manage asynchronous updates and deliver applications that feel polished, responsive, and engaging.
2.4 useImperativeHandle
The useImperativeHandle hook stands out as a powerful tool for customizing the interaction between parent and child components. This advanced hook offers a mechanism to fine-tune the instance value exposed through a ref, allowing for controlled access to specific methods and properties of a child component.
In React, the concept of data flow between parent and child components is fundamental. While props and callbacks cover a wide range of communication scenarios, there are instances where you might need more granular control over the interaction between components. This is where useImperativeHandle steps in.
The useImperativeHandle hook provides a way to customize the interface exposed by a child component’s instance when accessed through a ref. By doing so, you can encapsulate certain functionality within the child component while allowing the parent component to interact with specific methods or properties.
How useImperativeHandle Works:
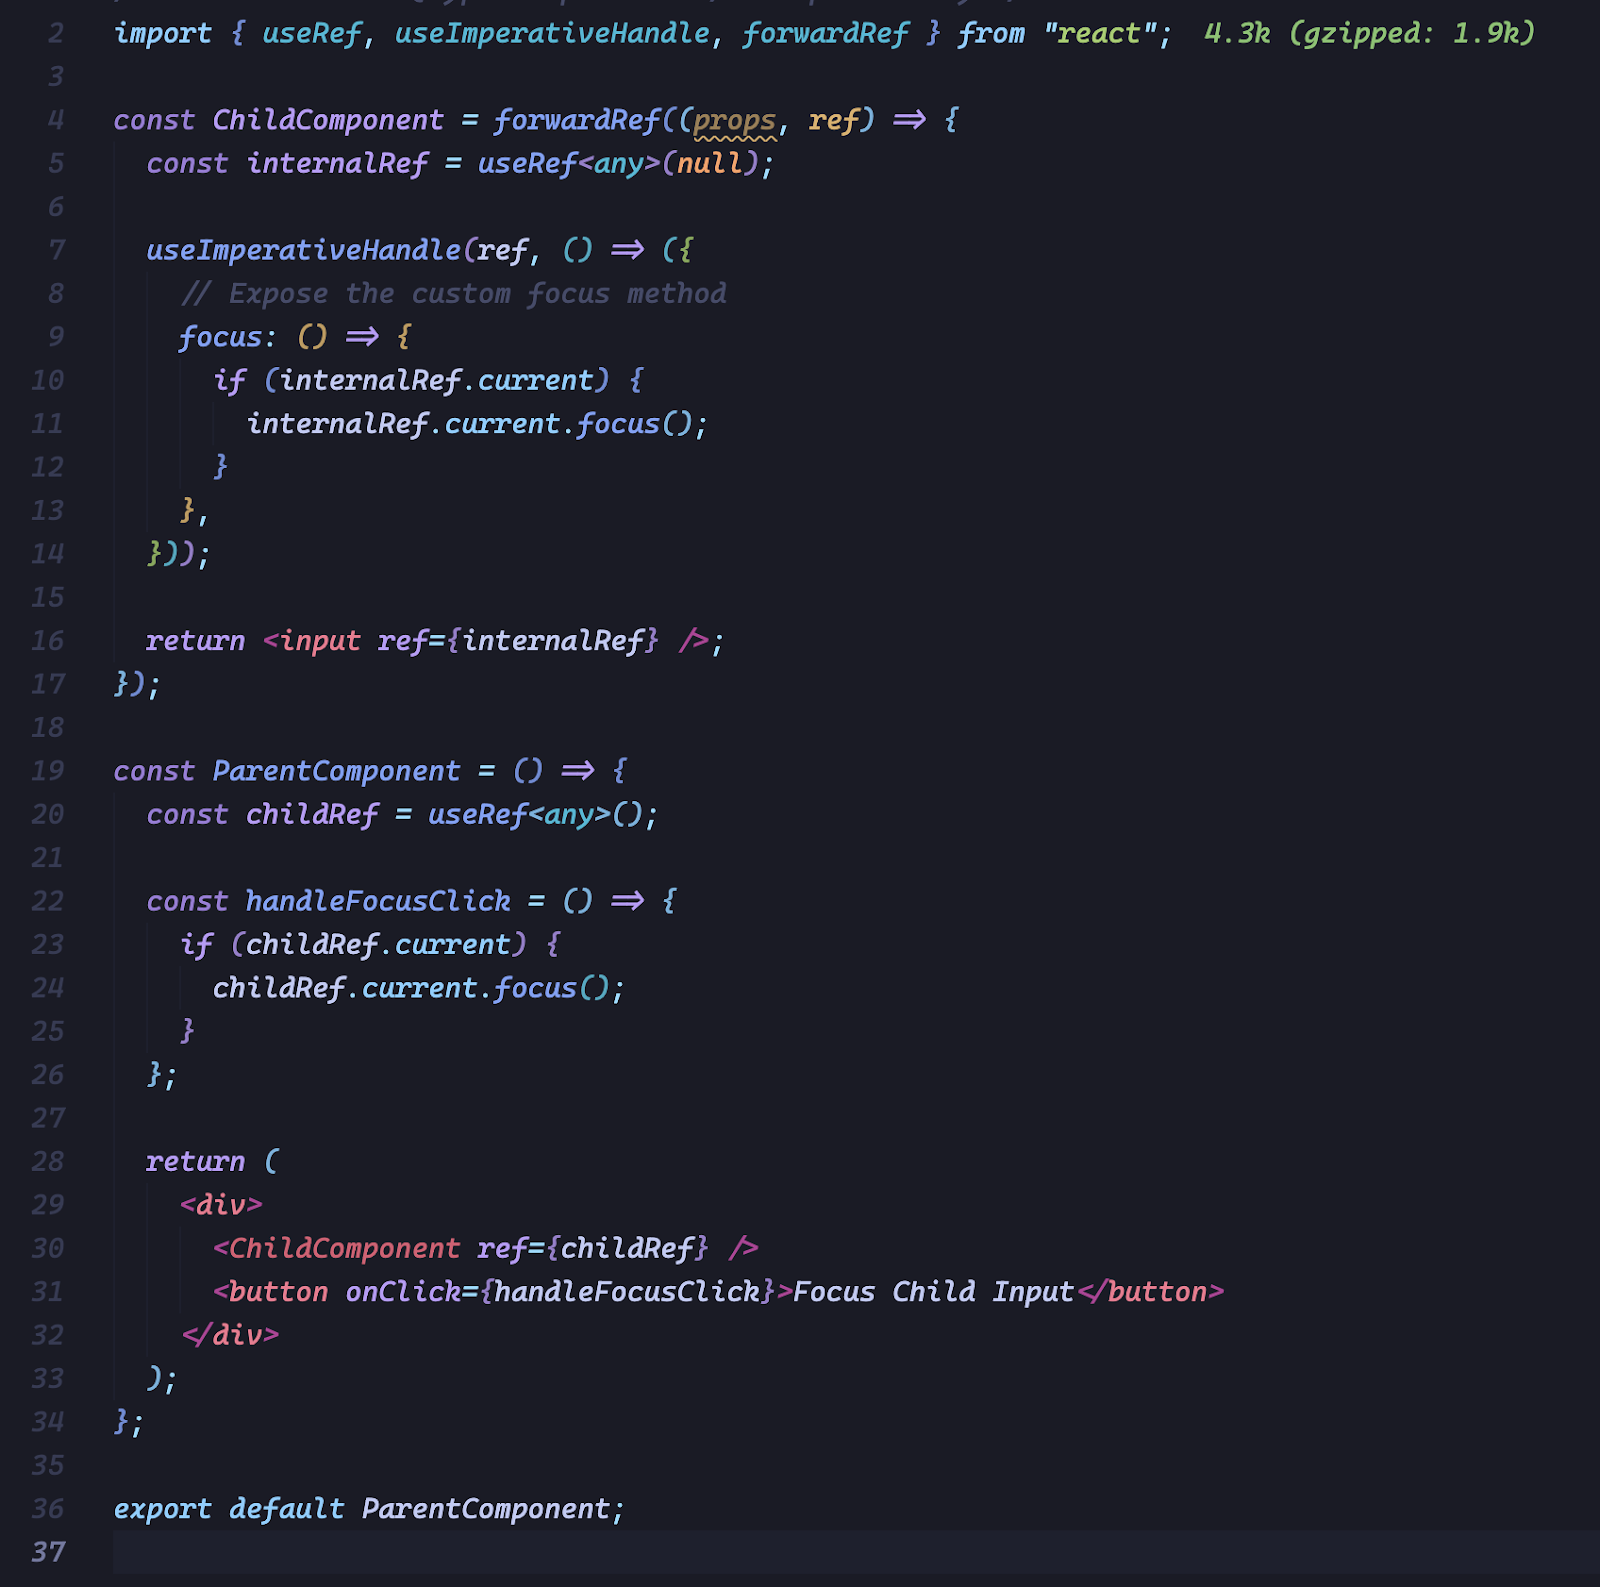
– To leverage the power of useImperativeHandle, you typically use it in combination with the forwardRef function. This setup allows you to specify which methods or properties should be accessible to the parent component. Let’s dive into a simple example to illustrate its usage:
In this example, useImperativeHandle allows us to expose a focus method from the ChildComponent to its parent. The parent can then utilize this method to interact with the child component’s internal logic.
useImperativeHandle shines in scenarios where:
– You want to provide a controlled and refined interface to the parent component, avoiding exposing unnecessary methods or properties.
– You’re building UI components with complex internal logic that requires precise interactions from the parent component.
However, it’s important to use useImperativeHandle judiciously. While it can be a powerful tool, overusing it might lead to tightly coupled components and hinder the maintainability of your codebase.
2.5 useLayoutEffect
One such hook, useLayoutEffect, deserves special attention when it comes to orchestrating intricate interactions with the Document Object Model (DOM) in React applications.
In the realm of React components, rendering involves not only updating the virtual DOM but also applying those changes to the actual DOM. This introduces two distinct phases: the render phase and the layout phase. The standard useEffect hook is designed to run during the render phase, right after the browser repaints the screen, making it ideal for most asynchronous tasks.
However, certain scenarios require us to interact with the DOM immediately after it’s updated but before the browser repaints. This is where useLayoutEffect comes into play. By using this hook, you ensure that your code executes synchronously during the layout phase, allowing you to fine-tune the DOM based on the latest updates.
useLayoutEffect is particularly useful in the following situations:
– DOM Measurements: Need to determine an element’s dimensions, position, or other metrics based on the updated layout? useLayoutEffect is your go-to hook for obtaining precise measurements after rendering.
– Immediate DOM Modifications: If you have to make DOM modifications that impact layout, appearance, or visual interactions and require these changes to take effect immediately, useLayoutEffect is your friend.
– Smooth Animations and Transitions: When you’re orchestrating animations or transitions that should start right after rendering but before the user sees the changes, useLayoutEffect can ensure a seamless experience.
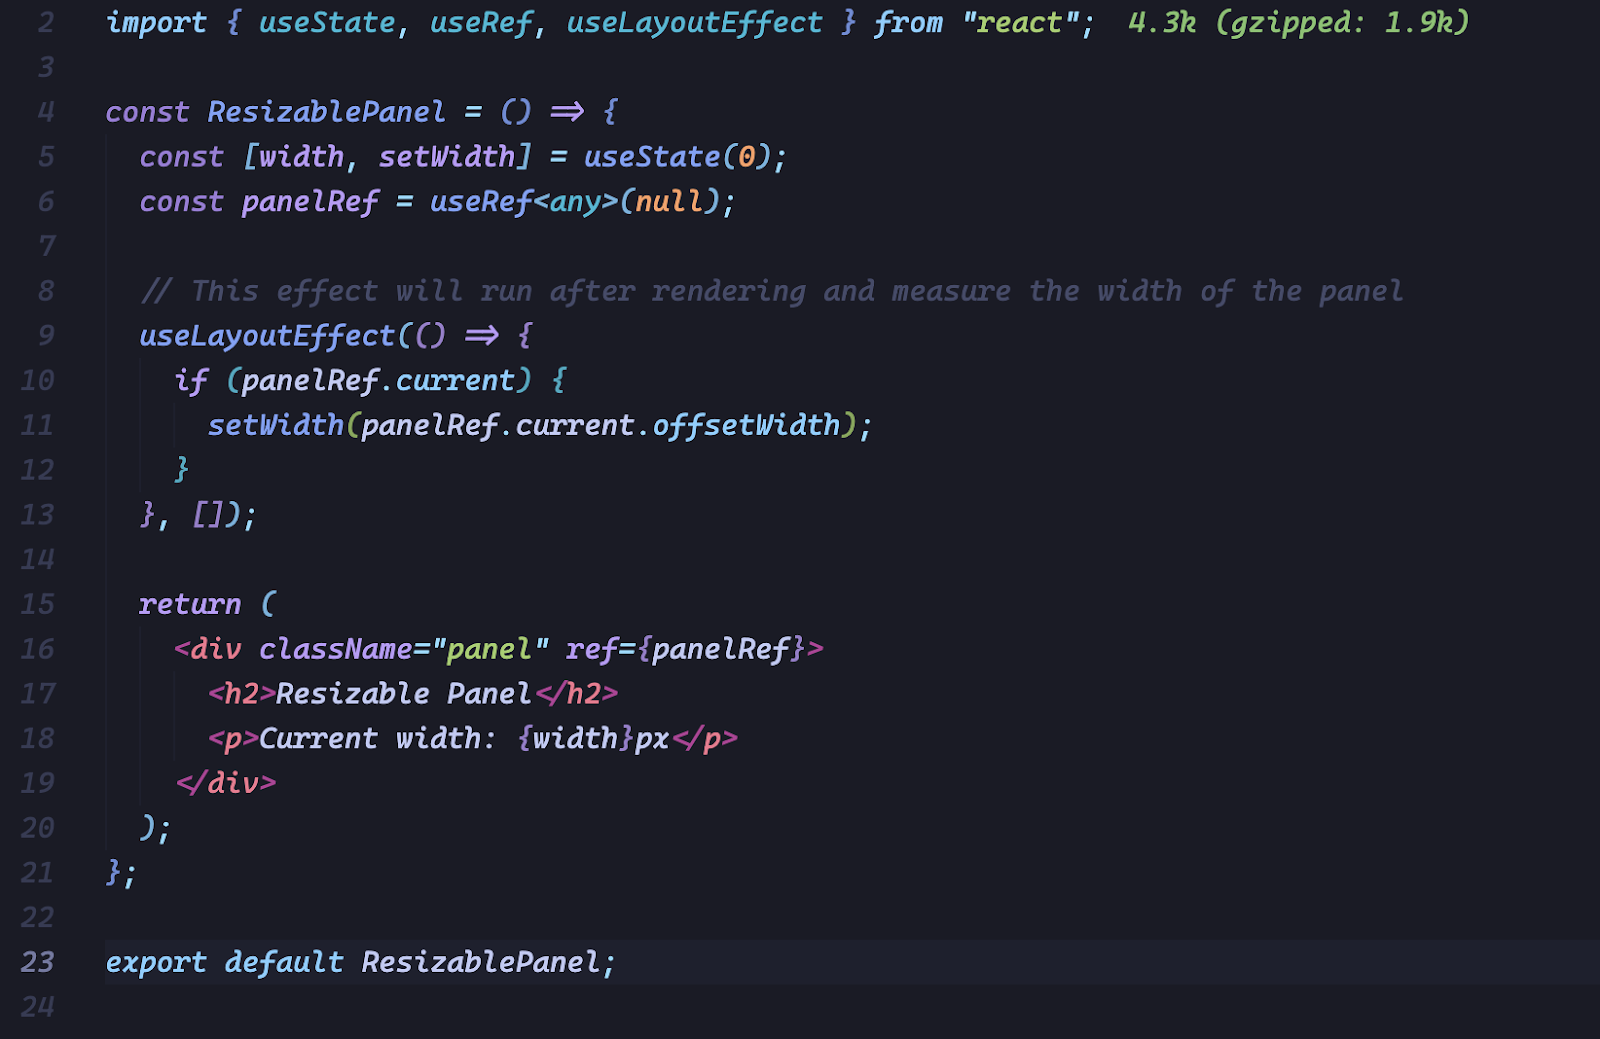
Example of using useLayoutEffect:
In this example, we’re creating a ResizablePanel component that uses the useLayoutEffect hook to measure the width of the panel element after rendering. We’re using the offsetWidth property of the DOM element to obtain its width in pixels.
Whenever the ResizablePanel component renders, the useLayoutEffect hook will measure the width of the panel element, and this information will be displayed in the component’s UI. This allows the panel to dynamically adjust its content based on its width after rendering, ensuring a smooth user experience.
The useLayoutEffect hook empowers React developers to seamlessly integrate with the intricate dance of the DOM’s rendering and layout phases. By wielding this advanced hook wisely, you can achieve fine-tuned control over your React components’ interactions with the underlying HTML structure.
3. Custom hooks
3.1. Introduction to custom hooks
In the realm of modern React development, hooks have become an indispensable tool for building powerful and functional components. Hooks revolutionized the way developers handle stateful logic in functional components. While React provides some built-in hooks, developers can take their React skills to the next level by creating custom hooks.
Custom hooks are user-defined hooks that encapsulate reusable stateful logic, enabling developers to share this logic across different components. They offer a more organized and efficient way to manage complex logic and state in applications. By abstracting away intricate business logic into concise and reusable functions, custom hooks make code reusability, reduce duplication, and enhance the overall maintainability of the codebase.
3.2. Benefits of creating custom hooks for code reusability
One of the primary advantages of creating custom hooks in React is the significant boost they bring to code reusability. As developers, we constantly strive to write clean, maintainable, and efficient code that can be easily shared and used across various parts of our application.
– Abstraction of Complex Logic: Custom hooks allow us to abstract the complex logic into a single, reusable function. We can keep our components focused on their primary responsibilities, leading to more concise and readable code.
– Sharing Stateful Logic: Instead of duplicating this logic in different components, custom hooks enable us to extract and share this common stateful logic across multiple parts of the application.
– Don’t Repeat Yourself: By centralizing logic in a custom hook, we avoid duplicating the same code in various places, reducing the chance of bugs and making it easier to maintain and update the application.
– Easy Testing and Maintenance: Custom hooks can be tested independently, ensuring their correctness and reliability. Additionally, we can update the custom hook in one place, and all the components using it will automatically benefit from the updates.
– Enhancing Collaboration: Custom hooks promote collaboration among team members.
– Reusable Across Projects: Once created, custom hooks can be easily ported and reused across different projects.
By adopting custom hooks in your React projects, you can build more maintainable, modular, and collaborative codebases that are easy to test and update. Embrace the power of custom hooks and take your React development skills to the next level.
3.3. Example of creating a custom hook
3.3.1 useDeviceDetect:
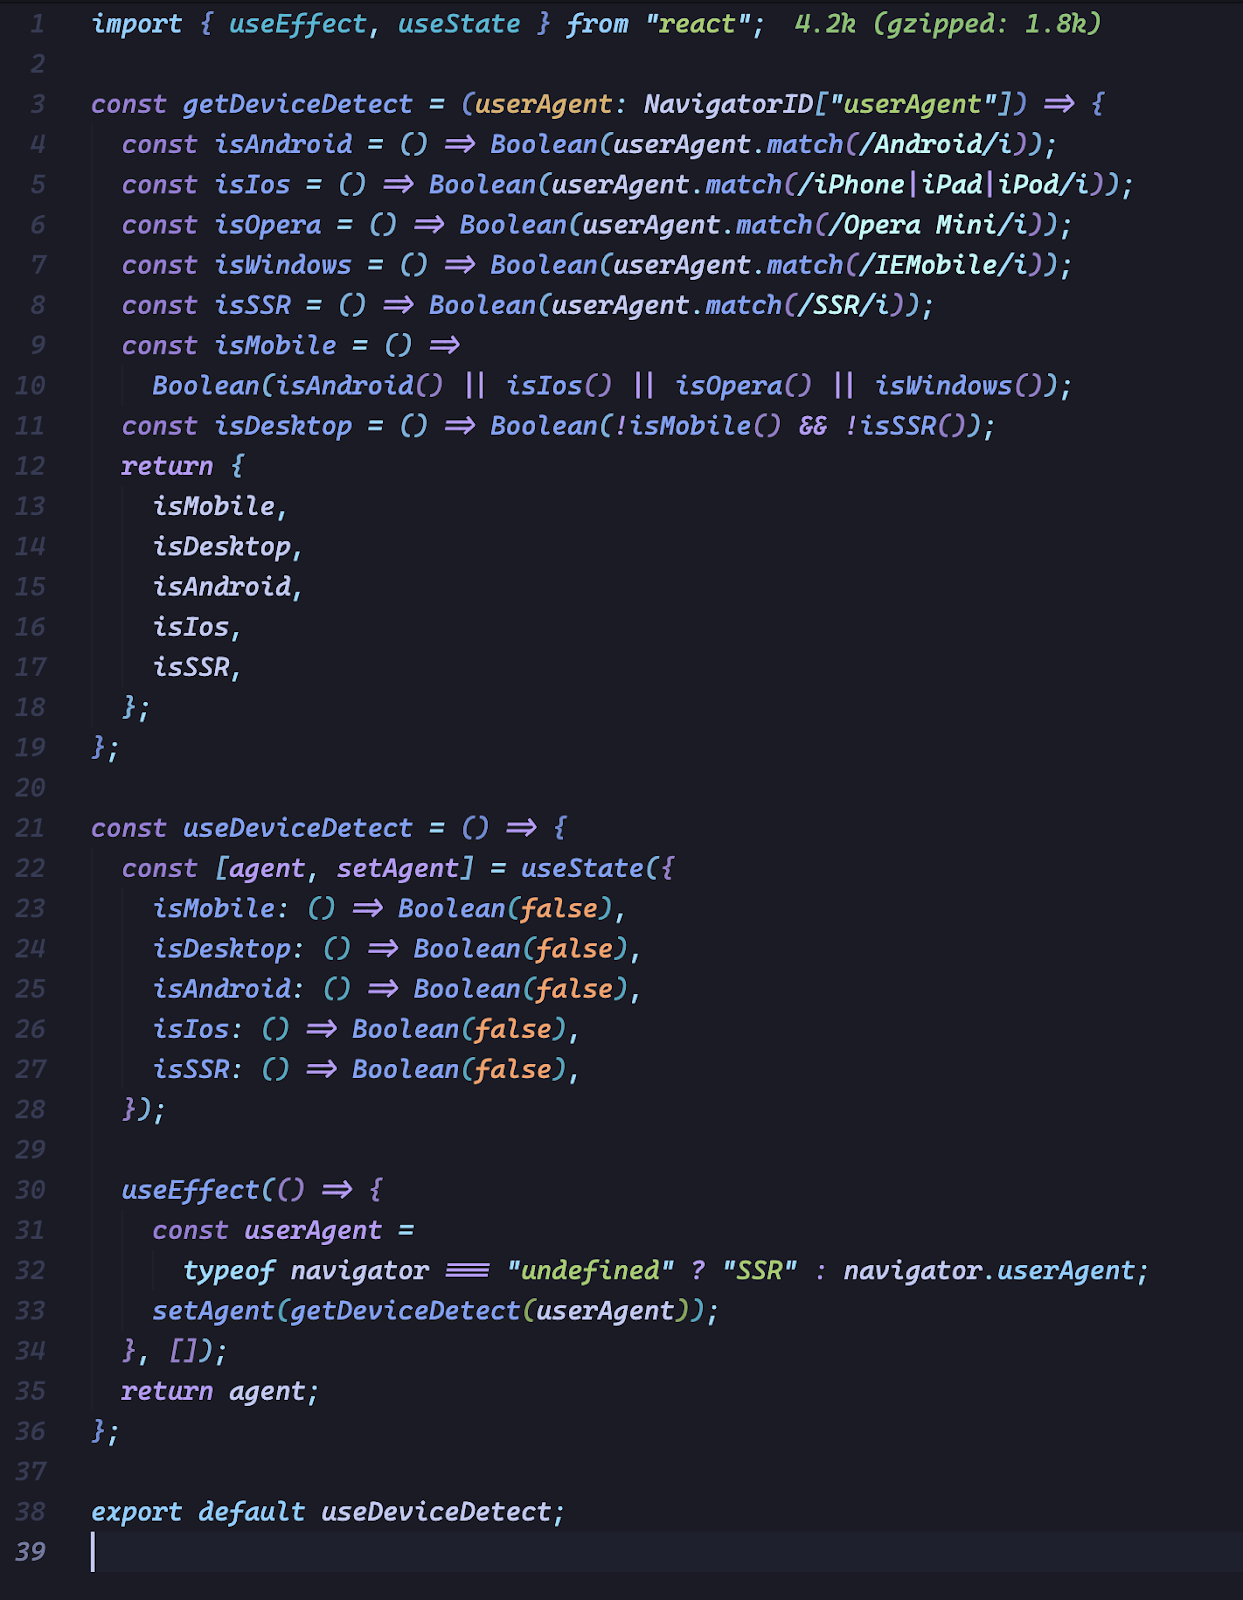
– In the ever-evolving landscape of web development, creating responsive and adaptive user interfaces is paramount to delivering a seamless user experience. To achieve this, we often need to tailor our application’s behavior and design based on the type of device our users are accessing it from. Enter the useDeviceDetect hook, a handy tool that simplifies device detection within your React components.
– When we want to detect a device type, we can define a hook like below, we will reuse it for multiple components and pages.
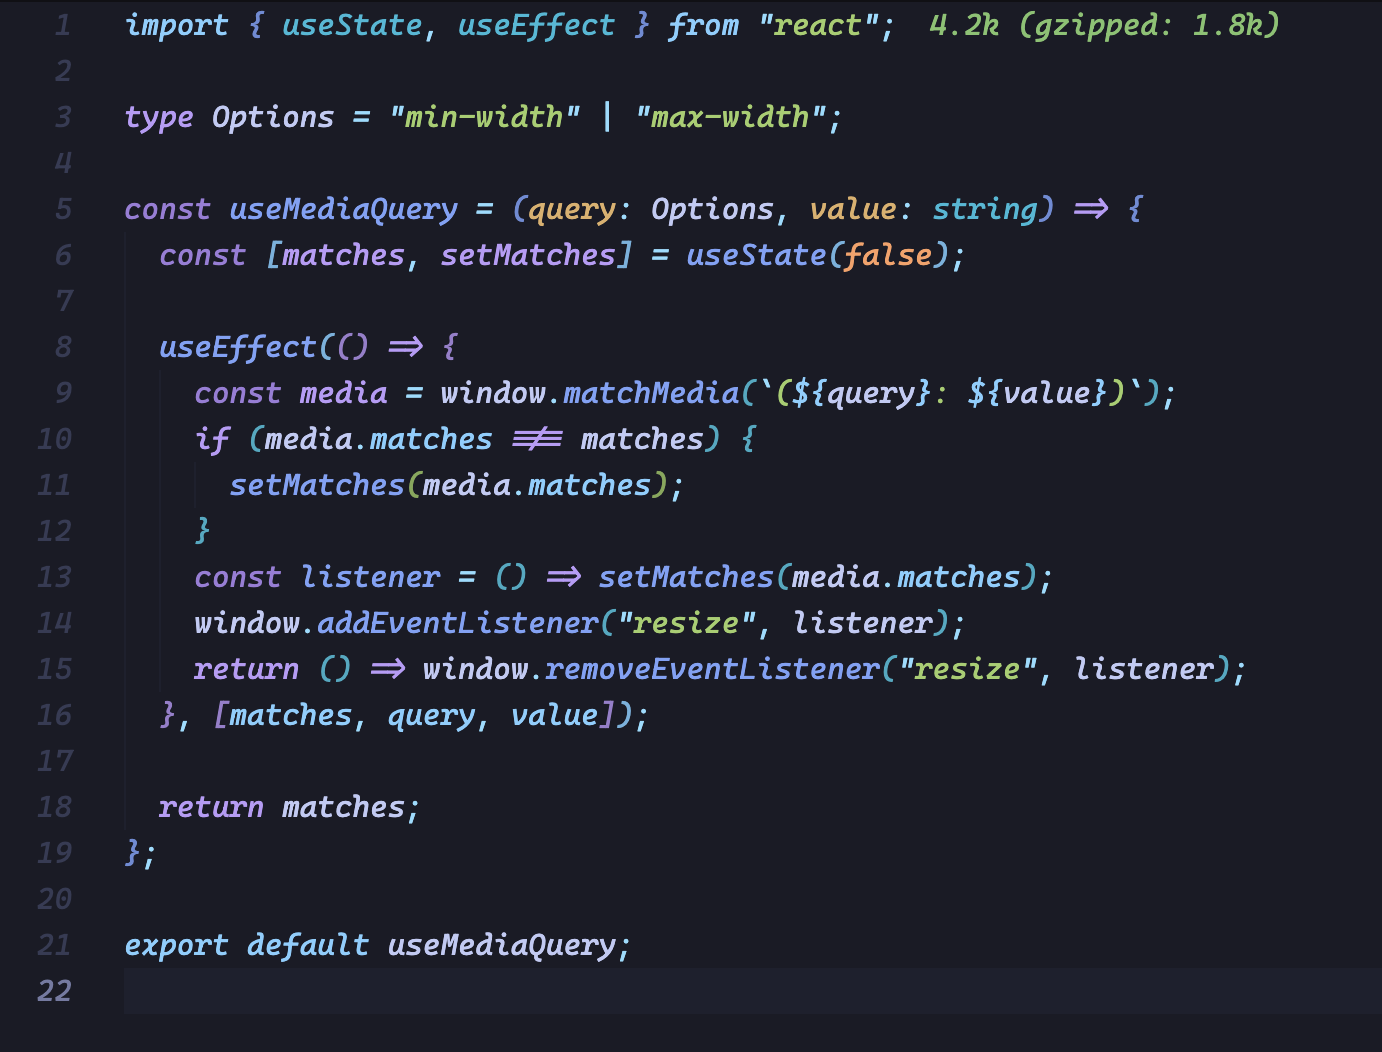
3.3.2. useMediaQuery
– When we want to check the width of the screen, check whether the screen is on desktop, tablet or mobile in component logic code, not in css, we can define a hook like below:
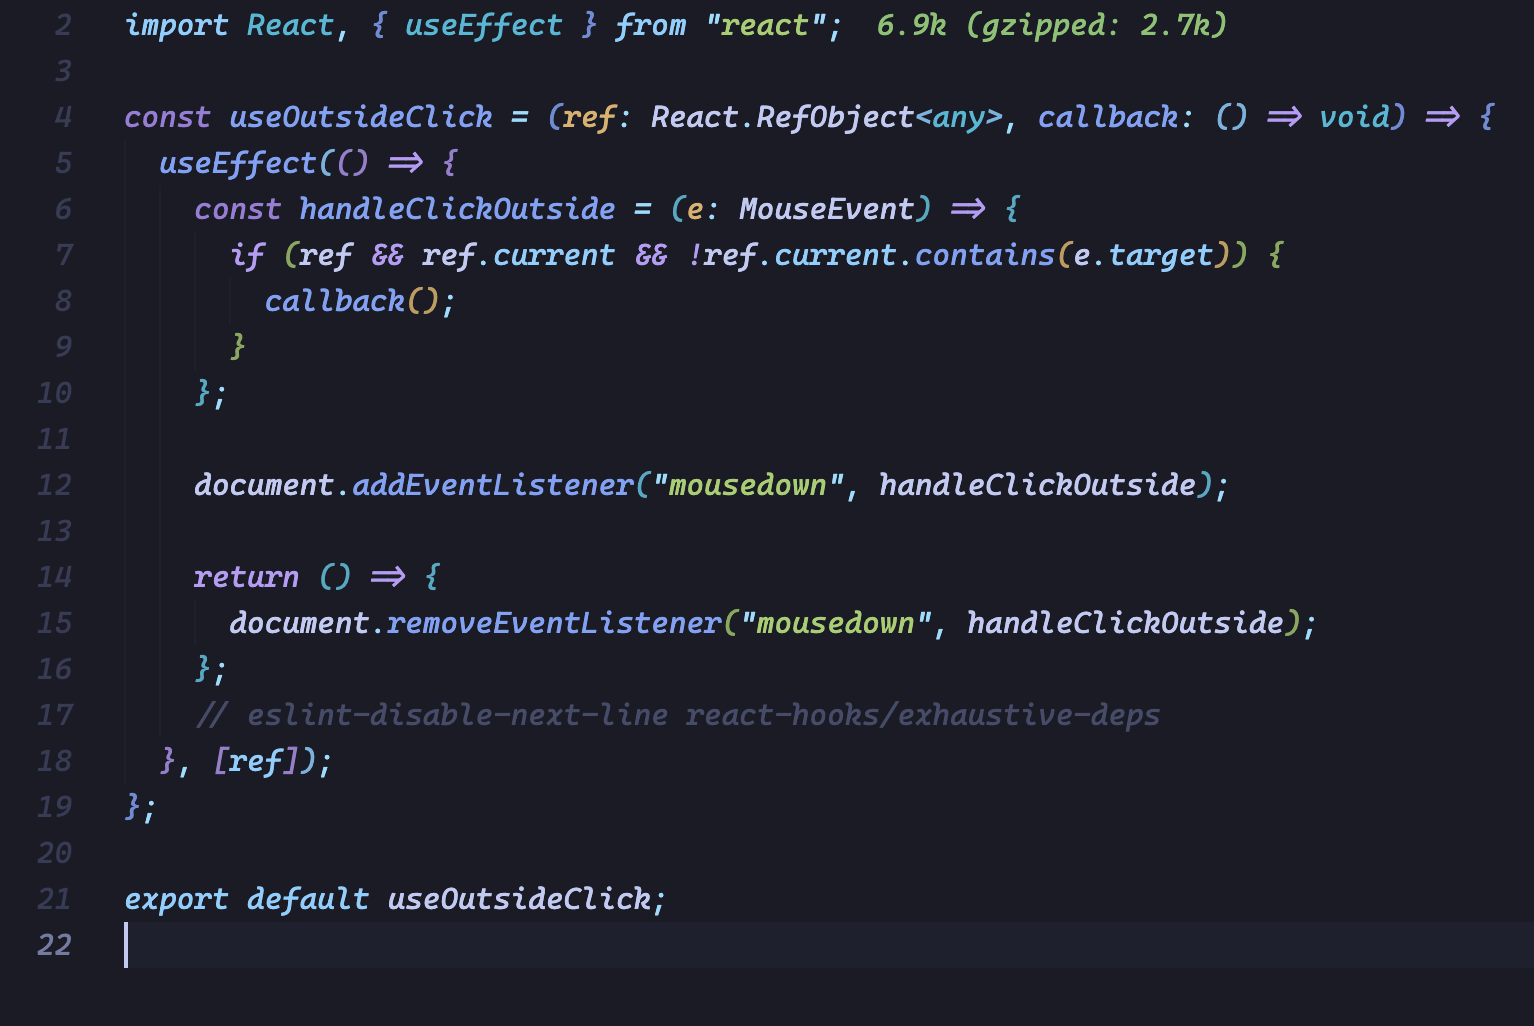
3.3.3. useOutsideClick
– When we want to handle the logic close or open a modal or a popover, we will check whether we click inside or outside the items, we can define a hook like below:
3.3.4. useCurrentCountry
– When we want to reuse logic get current country from local storage, we can define a hook like below:
4. Best practices for using advanced hooks
When working with advanced hooks in React, it’s essential to follow best practices to ensure the smooth functioning of your components and to maintain a clean and efficient codebase. Let’s explore some key best practices and guidelines to keep in mind when using advanced hooks.
4.1. Keeping hooks rules and guidelines in mind
– Hooks Dependency Rules: Ensure that hooks like useState and useEffect are always called at the top level of your functional component. Avoid calling hooks conditionally or inside loops, as this could lead to unexpected behavior.
– Custom Hook Naming: Follow a consistent naming convention for custom hooks to make their purpose clear. Begin custom hook names with “use” to signify that they are hooks and should follow the rules of hooks.
– Custom Hook Abstraction: Aim to create custom hooks that are highly reusable and encapsulate specific behavior. This ensures that they can be effortlessly shared and used across multiple components.
Example: Suppose we have a custom hook called useCounter, which manages a count state and increments it at a specified interval using the useEffect hook. To follow the rules of hooks, we must ensure that the useEffect hook is called at the top level of the custom hook:
4.2. Avoiding common mistakes and anti-patterns
– Missing Dependency Array: Be cautious with the useEffect hook and make sure to specify the appropriate dependency array. Omitting this array or providing an incomplete one can lead to unintended side effects and bugs.
– Using Hooks Inside Loops: As mentioned before, avoid using hooks inside loops, as this can result in multiple hook calls and unexpected behavior.
– Not Returning JSX: Remember that custom hooks should return JSX elements or other data that React can render. Avoid returning primitive values like strings or numbers.
Example: we have a custom hook called useFetchData, which fetches data from an API using the fetch function. One common mistake to avoid is not specifying the dependency array in the useEffect hook, which can lead to an infinite loop of API calls:
4.3. Tips for testing and debugging components with advanced hooks
– Mocking Custom Hooks: When testing components that use custom hooks, consider mocking the custom hooks to isolate the component’s behavior. This allows you to focus on testing the component’s logic independently.
– Using Testing Libraries: Leverage popular testing libraries like react-testing-library or enzyme to efficiently test components with hooks. These libraries provide utilities to interact with hooks and assert their behavior.
– Debugging with DevTools: Take advantage of React DevTools to inspect the state and props of your components. DevTools can help you identify issues with hooks’ dependencies or unintended re-renders.
Example:
Let’s illustrate these best practices with an example. Suppose we are building a simple “TodoList” component using custom hooks. Here’s how we can apply the best practices:

– We follow the hooks dependency rules and call useTodos at the top level of the TodoList component.
– The custom hook useTodos encapsulates the logic for managing todos, ensuring reusability.
– The hook is named with the “use” prefix, indicating that it is a custom hook.
– We avoid common mistakes, such as using hooks inside loops or missing dependency arrays for useEffect.
– For testing, we could use libraries like react-testing-library to assert the rendering and functionality of the TodoList component.
5. Conclusion
In conclusion, custom hooks in React offer a myriad of benefits that significantly enhance the development process. By abstracting complex logic into reusable functions, custom hooks make code reusability and maintainability. They empower developers to build more modular and organized components, leading to a cleaner and more readable codebase.
Custom hooks also facilitate easy testing and maintenance, allowing developers to ensure the reliability and stability of their applications. Moreover, by promoting collaboration among team members through the sharing of custom hooks, developers can streamline their workflow and create cohesive application architectures.
As React continues to evolve, hooks are poised to remain a fundamental aspect of its development ecosystem, ensuring that custom hooks will play a pivotal role in shaping the future of React development. Embracing advanced hooks and custom hooks is a powerful step towards unlocking the full potential of React and taking your applications to new heights of efficiency and innovation.
Resources
- Demo source code: Repos’s link
References




.webp)